
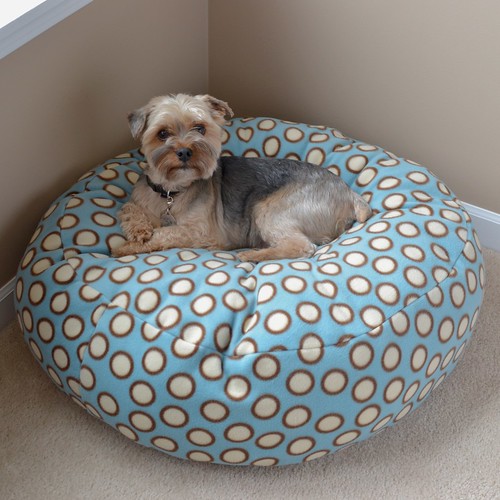
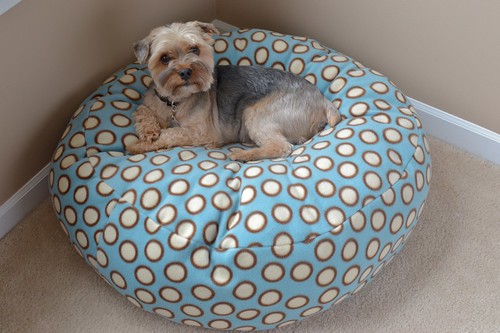
Loki got a new bed today and the weather held out for photos, so you all get a new tutorial! Read below to learn how to make this cute fluffy fleece dog bed!

You’ll need 1 1/4 yards of fleece. (This is Debbie Mumm fleece from JoAnn, so it’s a little nicer than their standard fleece.) I cut TWO 26″ circles. His little butt won’t hang off of this one! Then, I did a little math. After a 1/2″ seam allowance, the circle is 25″, so 3.14*25= 78.5. 78.5/2 is 39.25 + another 1/2″ seam allowance = let’s say 40. That means we need two pieces that are at least 40″ long. I cut mine 9″ high by 44″ long to make sure I had enough.
This should help explain how I cut it out:

I cut the 26″ square first, then folded in it fourths. I measured 13″ from the center point in several places and marked it with chalk (or a sharpie, I can’t remember…) Then I used my super-sharp Ginghers to slice through all 8 layers of fleece. It doesn’t have to be perfect! And I say that being a perfectionist. But seriously, if it’s slightly oval or choppy or whatever it doesn’t matter as long as it’s consistent top and bottom. Any choppiness will end up in the seam allowance, and a wonky shape won’t be noticeable once it’s stuffed.
(If you buy 1 1/3 yards, you can squeeze out 28″ circles, but not much more than that.)

Now, sew the long pieces together on the short side, right sides together, to make once long piece. I used a 1/2″ seam allowance and my walking foot for the whole project.


Now mark the halfway points on both circles. I folded them in half and marked each spot with a pin.

Now take one circle and place it right sides together with the long piece, matching the center seam to the center point.

Sew in both directions starting from this center point/seam to 4″ from the other center point. 
This diagram will help:

Sew the other circle in the same manner. You should now have the top and bottom attached, and 8″ open at the center on the top and bottom.


Now pin the seams all the way up to the center point, then fold the excess back and pin it in place. Sew all the way across the top and bottom seams.

This should give you a finished bed with a hole in the middle where you will turn and stuff the bed.

Turn it right sides out:

Now you’ll need two pillows. Pillows are cheaper than stuffing! I get them for $3-$4 when I can combine sales and coupons. Target and Kohl’s are good for cheap pillow deals.

Perform some surgery on your pillows. Try to fluff up the stuffing as best you can and stuff it into the bed. Keep stuffing! It will smoosh down, so while you are going for more “disc” than “ball” keep in mind you may need to over-stuff a little bit. A lint roller and vacuum are helpful for cleanup after this step.

Add a minion to check for fluffiness. This one couldn’t wait to try the bed! He actually jumped OVER me to get to it.

Now you need to hand-stitch the opening closed. You could machine stitch, but hand-stitching will look more seamless and it will allow you to open the bed back up easily should you need to add more stuffing. (For washing, I just shove the whole bed in my front loader. If you can wash two pillows, you can wash this.)

Insert your needle back behind one of the folds and push it through at the top seam. Use a ladder stitch back and forth, taking big stitches – about every 1/4″-1/2″ all the way to the bottom.


Pause to pet the doggie who is sitting on the bed while you do this. (Partly because he likes his new bed, but mostly because I have the camera and he knows he gets to pose for the camera… and get treats.)

Keep sewing…


Tie off the last stitch a couple times and bury the thread:

Done!
Thats cute! I’ve been wanting to make one for my little one and now I will! :) thank you for this
Minions always think they make the best helpers. :)
Suzee – You are welcome! Loki thinks every dog should have at least a bed in every room :)
Carey – Yes, they do, don’t they? :)
[…] Erin from Dog Under My Desk shares a tutorial on her blog showing how to make a dog bed out of fleece. She gives the dimensions to make one that with a 26″ diameter, but she also explains her math so you could make another size. Get the tutorial. […]
Never thought about using pillows for their stuffing. Thanks for the tip!
I will definitley be making this for my cats. The pillow idea is genius really. Love your pup!
Wow! This is truly inspirational! I have been trying to find a dog bed for my German Shepherd for AGES of decent quality and at a reasonable price. I’ve yet to find one, but now I know I don’t have to! I never even thought about making one! Thank you SO much for this great inspiration! My dog (and many others) are indebted to you!
Thanks everyone! My inspiration for the pillows comes from the doggies – I always find them sleeping on a pile of pillows. So why not fill their dog beds with pillows? That’s what they choose, so I know they like them :)
Tessa you can easily make this bigger – you will just need more fabric since the fleece is only about 58″ wide so really the largest circle you can cut out is about 28″ with the fleece folded in half. You’ll have to buy more yardage and unfold it and fold it the other way to cut out a larger circle. Fleece is in sale right now at JoAnns for 3.99 a yard, so you could probably buy 2 yards cheaper than my 1.25 yards! Total I spent around $15 for this, including pillows and the “premium” fleece that I bought. You could also cut into a fleece blanket (usually around 50″x60″) or buy those tie blanket kits. I’m always on the hunt for cheap fleece fabric! I scored a cute fleece valentine’s heart blanket at Target the day after V-day on clearance for $3. I guess I always have dog beds (and sewing) in mind even when I’m shopping for my laundry detergent :)
Any suggestions for other types of fabric to use? I have a lab and his hair seems to be IMPOSSIBLE to get out of fleece. No amount of washing or lint brush rolling helps unfortunately…
I would use fleece blankets. you can find several out there with dog designs on them . kohls has a few but you can find them several places. I know this is being answered years after the question was asked but it will help new people who come across this post.
Kelly – I know I am spoiled by the lack of shedding, although we do doggie bath time a couple times a week so I guess it’s a trade off. Most commercial big dog beds are made out of microfiber or upholstery fabric. I would say hit the clearance home dec section at JoAnns and see what you can find? I also used Minkee on one and that worked great – the real stuff by Benartex. I don’t know how it is with lab hair but I bet someone does, since it’s so popular. It’s soft but not like fleece so it might not have the same problem. Canvas would be great if you have access to good stuff, maybe like the Jessica Jones line? The best part about the fleece is that it stretches, so when sewing around the bed you can stretch it and totally fudge it to make it fit, plus it doesn’t ravel, but I still think canvas would work really well.
I am using canvas for the one I am making since my dog likes to chew on his bed. I picked up a painters canvas drop cloth on clearance. It’s durable and washable.
[…] Fleece Dog Bed – Dog Under My Desk […]
What a great tutorial!I’m visiting from 101 summer sewing tutorials roundup. Have a great day! https://runwithglitter.blogspot.com
The only reason I read this was because I saw “Loki.” But, after reading this, I’m quite happy that I now know an easy way to make a dog bed for my mom’s cats. Thank you!
I never thought of using pillows for stuffing, what a great idea. I need to make a bed like yours for my little chihuahua. Great instructions.
I never thought of using pillows for stuffing, what a great idea. I need to make a bed like yours for my little chihuahua. Great instructions.
I love the idea of pillows for stuffing. Such a great tutorial, thankyou! I am going to make this for sure.
The REAL quick way is to make a small pillow-case & put your OLD pillow in it(sew up the end or put in a zipper)…it will hold it’s shape MUCH better when washed. Polyfil gets all lumpy in the laundry & a pet bed MUST be washable.
LOL Yeah mine love pillows. They help themselves to any pillow they can find :)
I’ve made four of these beds and we have no trouble washing them. I think it’s because I fluff up the stuffing first, then pack it pretty full. I think it depends on the type of pillows you buy too – I’ve had better luck with the fluffy “alternative down” as opposed to the rolled up poly pillows, but those to work OK too if you fluff them up.
If you are really worried about lumps, there is some really great (though expensive stuff) that is basically shredded memory foam. It’s called something like cluster fill or cluster fluff. I’ve never used it but I know people who swear by it.
Create 4 Less has really good deals on fiberfill stuffing sometimes. I searched and searched until I found them when I was making a vinyl footstool for my honey that needed a ton of stuffing. Their best price right now is 20 ounces for about $7.69. However, I hadn’t thought of using pillows at the time, which would have been the better deal I think, though I would have needed four or five of them.
Great simple tutorial. I’ll come back to it once our pup is done with destroying beds and I can trust her not to eat one that I make.
What size would you make the circle for your smaller pup? I have two 6 lb Yorkies and I’d like to make them some new beds! :)
I would say anything from 21″-24″ finished size would be great for the little guys. Here is Sammy on a 21″ round, 7″ high bed. https://flic.kr/p/7PQnnm The only thing is that you probably want to make it an inch or two shorter. Nothing is too high for Sam – she thinks she can fly. But a 7″ tall bed is probably too high for most 7″ tall dogs :) I would go with 6″ high, so that there is still room to sink in! Don’t forget seam allowances!
Awwww I’m deff gonna make some of these for my doggies. I have 4 and buying beds is just too expensive, I usually just give them old pillows and blankets. (or they steal my bed)
Btw, what breed is Loki? He looks like my Silky.
Mine love pillows too! The higher the pile the better! Loki is a Yorkie, they both are. He has coloring more like a silky but he actually has a cotton coat. He is big for a Yorkie – I’m sure he does not have the best bloodlines, even though he is AKC, although the bigger ones are more common than you would think. We jokingly call them “teapots” :) His thick cotton coat is what lets him rock the puppy cut!
Thank you so much for this tutorial. I made one for my chihuahua tonight :) I used minky fabric instead of fleece… with a coupon at the craft store, it’s really not much more expensive, and it was super easy to sew! It took two hours to sew up and I used two old pillows & almost an entire body pillow to stuff it. It’s going to look so much nicer in our living room than the old blanket laying in the corner that he just wouldn’t get off of. Now he has something much prettier and softer :) Thanks again!!!
You are so welcome! I’ve made a couple using minky too and they have turned out great! I’m sure he will love it :)
Yes, Erin! He loves it! and so does my near 2 year old little girl! I’m going to make her one today too… haha!
once again… I wish I could sew!! (someday, I will learn!)
Thanks so much for this! My lil’monster is gonna love it!
What a great idea to use pillows for the stuffing. It’s one of those aha moments where I ask myself why didn’t I think of that. Thanks!
This is such a cute bed!
I must say your babies are gorgeous!
Love the hair cuts, I never see yorkies with short hair!
I FINALLY had the chance to make this cute bed for my medium sized black lab mix (he is luckily ~50 lbs cuz he barely fits on the one I made). I used the 1 1/3 yards to squeeze out larger circles and he couldn’t wait. He slept on it ALL last night instead of going into a guest bedroom and sleeping on an actual bed…he’s pretty pumped and I am so thrilled. Thanks for the amazing tutorial!
Your dogs are absolutely adorable (and so is the bed)! If I had dogs that cute, I don’t think I’d get anything done but holding them all day. ;)
My sister just got a pair of toy poodles, so I think I may be making two of these dog beds as Christmas gifts. Thanks for the tutorial!
I love this tutorial. I made it with all fleece and the fiberfil showed lumpiness no matter what I did. What would be a good fabric to line the fleece with? Or any other suggestions?
Thank you! I think it depends a little bit on the quality of the fleece and the type of stuffing. A dense pillow is going to have to be pulled apart like crazy – one with more of a cluster fill is going to look better. I got a better effect when I used a slightly better pillow (I mean we’re talking a $7 pillow vs. a $4 pillow, on sale. Nothing super expensive.) I also prefer thicker fleece – the fleece in the tutorial is the really thick Debbie Mumm fleece from the quilting cotton section at JoAnn’s. I made one from a thinner kid’s fleecey/minky blanket that is pretty lumpy. Another thing that helped a lot was stuffing them very full. The two that I stuffed until I could stuff no more are not lumpy at all, especially after they squished down a little bit. The way you stuff it helps too. It’s best to either keep the pillow very intact (not easy and it might look odd) or really pull the stuffing apart like crazy to fluff it up. Otherwise you just get lots of lumps of stuffing. Try sticking your hands inside and pulling as many of the fibers apart as possible. That will probably help a lot.
As far as lining it – it would have to be another knit (stretchy) fabric or it would kind of loose the slumber ball effect. The fleece might get stretched out and a plain cotton would not, so it would look like the cover was loose. If you want to use a regular cotton, I think it would still be cute but I wouldn’t combine a woven and a fleece/knit, if that makes sense? I’m going to use plain cotton and quilt it in my next bed tutorial.
My aunt picked out some thin cuddle fabric for me to make one for her dog, so i’ll try that and let you know if I think of any tricks to make it better :)
I love this! Your tutorial is very easy to follow and, of course, your model is a cute as can be. I love how her paws are crossed in the final picture! Thanks for sharing!
Cute! How does it hold up to washing? Does the stuffing hold it’s shape well?
[…] Dog Bed Erin at Dog Under My Desk shows you how to make a Fleece Dog Bed. Erin has a series of great tutorials to help you make special things for dogs, including a Little […]
This is WONDERFUL!! Almost as cute as your sweet babies. We adopted our “Hamlet” from the local shelter just over a year ago. He’s about 18 months old and a good 50 pounds now and we just love him to death. But no matter what we try our new little friend just will not give up chewing to destruction on anything filled with fiber or foam stuffing. He’s taken to all his training so well, I just can’t figure out this chewing up anything foam-filled. His most recent tirade centered on his own bed — which he loved to lie on. Well, I’ve been shopping for a new bed, but I can’t find anything that is not filled with foam of some kind. Our dogs used to sleep on nice beds filled with cedar chips (which repel fleas) but these just don’t seem to be on the market any more. With this beautiful tutorial I can whip out a terrific doggie bed and run down to the local garden store for cedar chips (which are meant to decorate the garden) to fill it with. My mind is thinking “make two, one with a velcro zipper which will be the outside cover so you can wash it!” Thank you so much!
Donna – they hold up as well as the fleece would in any other blanket or whatever. I have a few I’ve washed a dozen times or so and they are fine, starting to get pilled but not falling apart or anything. They need to be replaced right around the time I get bored with looking at them :) They come out of the dryer extra fluffy! I think the minky one and this blue one have held up the best, because I used better materials for them.
Annalee – I’m working on a tutorial for a zipper (work keeps getting in the way!) but instead of sewing up the opening I added an invisible zipper. You could probably do the same thing around one of the curved edges. He might stop chewing soon. Mine stopped, REALLY stopped chewing around 2 years old. Now they barely even want to chew on their own chew toys. They might get an ear on a toy pig soggy or something, but no more destroying things. At 18 months they were still chewing. I think it has to do with when they finally get all of their adult teeth, too.
One of these days I will get to the twill zippered bed, too :)
I found this and can’t wait to make it for my 2 babies for their Christmas present. I have an 80lbs something or other (vet wouldn’t even guess what she was, lol), and a 50lbs catahoula mix. The large one unfortunatley eats ANYTHING with zippers, so all the previous dog beds are toast. Really hoping for a difference with this pattern. Going to go to the fabric store soon with my 50% off coupon I found and try to get enough for 2 LARGE dog beds in one cut. wish me luck! Thanks for posting such a wonderful pattern that so many of us need!
Your bed is precious. I want to make a Christmas one. Thank you for sharing.
Any suggestions on how to make this for an older do who is incontinent? I have 2 old dogs, ones 14 the others 16 and they need beds.
Awesome pattern by the way :)
Miranda,
If your dog is incontinent, you probably don’t want to be washing the whole bed every day, so anything waterproof would be great. These do wash up really well but I try to keep the washing to every few weeks, not every day.
You could make the bed out of one of the nice new laminated fabrics, or maybe something like PUL- which I’ve recently seen at JoAnn Fabrics (although I’m not sure of the quality) or something like what they make plastic reusable shopping bags out of or something like that, maybe? And then you could just make a blanket to go on top, and wash/change the blanket every day. That way they have the cushion of the bed and something soft to go in top of it…
Thanks for the tip for pillows (got 3 at $2.50 each at Wal-Mart). I made a square pillow for my dog that is to have surgery Dec 22nd and I knew she would need a soft place that wasn’t too high. She already loves it…as does our other little dog. Good thing I made it big enough for the both of them.
[…] Under My Desk has a cute and easy sewing pattern for a dog bed up. But I see it much more as a really cute floor cushion that I may or may not share with any […]
You’r’e dog looks just like my Otis! (He is a mix of Yorkie and Schnauzer)
Thanks for the dog bed pattern, I am going to make this.
In the 90s, I had a bean bag dog bed for my spaniel that looked very much like this. I think I will adapt this pattern by installing an inner bag, filling that bag with beans and then stitching it up. With a larger opening on the outer bag and some velcro (because I stink at zipper installation) I should have a good facsimile of the old bean bag bed. Thank you so much for this tutorial. It was enough to finally get me off my duff and DO it.
Hi,
I saw this link on SewMamaSew & I am thinking of making some for my kids! Does that sound crazy? I think they look pretty comfy for watching telly or hanging around in their rooms etc… They are 3, 2 & 9 months & are all a bit like dogs at times lol ;-)
I’ll let you know if the project ever happens!
Thanks!
I think it would be neat! They would be great big floor pillows!
Love it I will try this out!!!!
for Miranda
i made a dog bed for our incontinent dog by using a waterproof mattress cover as the top of the inner bed. I then sewed two outer slipcovers. that way the stuffing was protected by the waterproof mattress pad. if she had an accident i just removed the outer cover, put on the clean one and washed the dirty one. it worked great. make sure the center of the bed has less stuffing so urine stays in the center and doesnt roll off the sides.
[…] Fleece Dog Bed – Dog Under My Desk […]
Just finished my dog bed tonight. Sam loves it.
Thanks for the inspiration and the tip on using bed pillows for the stuffing, it worked great!
I love the pattern for this and would love to make one for each of my dogs. The problem with that is, I have a 70lb Boxer and a 140lb Cane Corso. I would have to buy ALOT of fleece and pillows, lol
Really you could just buy like 3 yards of fleece and fold it in half and sew a giant disc or rectangle. The gusset makes it great for little dogs who like to snuggle down in but is your 140 pound dog used to sinking down into the bed he has now? I know they do make giant ball beds but when we dog sit our big dog friend Dino I know he is just as happy with a couch covered in a blanket as my dogs are with their big pillow beds :) You’d have to add a zipper or make a removable cover or something. The bonus to having little dogs is the entire bed fits in the washing machine. :)
I made this the day after I found the tutorial! Was SO easy and my doggy loves it!! I bought my polyfil at Hobby Lobby, it was only $2.99/bag and was on sale for 30% off! And if it wasn’t on sale they usually have a coupon! Thanks so much for the great how-to!!! :)
That’s great!! And you got a really good deal on poly-fil! :)
I love love love this pattern and will be making it or my yorkie :) xxxx
Ooh pics please when you’re done! :) Love those Yorkies.
Thanks so much! I used this pattern to make a bed for my fur-child Rat Terrier and just tweaked it to have a “burrow blanket” attached to the top. You made it simple to understand and for my first project with my new sewing machine I was impressed with myself, Thank You!
[IMG]https://i680.photobucket.com/albums/vv162/emilyaustinn/DSC02572.jpg[/IMG]
[IMG]https://i680.photobucket.com/albums/vv162/emilyaustinn/DSC02571.jpg[/IMG]
Its made out of old fleece blankets they had as a practice bed, now I will go get nice fleece to make a better version =)
It’s cute (the dog and the bed! heehee) Good job and thanks for sharing!!
Trying to add a photo….
Erin, This is adorable. Love the fabric and the dog. Now I just need a dog or two so I can make some beds..
I purchased and made your Two Zip Hipster and it went together like a dream. You are a talented pattern designer.
I love the dog bed (and the doggie). I am so going to make this for my dogs. For stuffing I plan to use the stuffing out of the old yucky pillows I’ve been storing in my basement for too long. Thanks for the great idea!
Oh my god, I absolutely love this! I have to make one for my dog ASAP!! He will love this bed so much.
Thanks so much for this DIY.
PS. Your dog is adorable!!
Love this! Can’t wait to make one for my grand-doggie!
Can’t wait to try this for our Shi Tzu. Will this be washable?
The ones that I’ve made are all washable. I have an older, very basic front loader and even the blue one fits in fine. I wash them all the time.
I would say if you can fit a Queen size comforter or two pillows in your machine, you can fit this.
[…] when I shopped for dog beds. One big fluffy pillow was marked $46.99! Then I found this tutorial for a fleece dog bed with very simple sewing instructions. The author uses new pillows for the stuffing but I would […]
Great pattern! I have two lhassas I will be making this for. Love the pillow idea for stuffing. I actually recently made a bed for my mastif (she’s 150 lbs!) by sewing the edges of four old pillows together to make a big square, then I made a grime-proof cover with an old vinyl/plasticky tablecloth, then I made a fabric cover with a zipper to go over it because washing is a must with that drool-Meister.
Very cute!! Dog beds are expensive! The best deals for a quality one is usually at Costco, but sometimes the fabrics are blah boring. I will definitely try making a couple of these (slightly bigger) for my two pit bulls :)
How much does the fabric cost? Does anyone know the price difference between this and a store bought one? Thanks for posting, we have two big dogs and seem to go through beds just from wear and tear. I really want to make some of these, they would also be great for gifts for dog lovers!
The fleece I used for this was $15/yard, but I’m sure I used a 40% off coupon. It’s the JoAnn premium line of fleece. Designer fleece/minky is around $15-$18/yard. You can buy very inexpensive fleece but I find it more difficult to work with and the quality poor. The pillows I used were $4-5 each. So total I spent less than $20 on it.
I can’t wait to make 2 of these for my little buddy’s…thank you for the pattern
Oh man I LOVE this pattern. We have 2 gigantic dogs so I am going to have to play with the size and may end making an oval shape because of space limitations but this is AWESOME! Thanks!
great tutorial, I love this bed and your lovely dog. hugs
I soo want to make this but not for the dog this is gonna be a bean-bag type chair for me!
Awesome :) Let me know how that turns out!
Thanks so much for the tips on getting stuffing CHEAP, since I’ve got projects done but balked at the price of filling them. Bargain Pillows!! Brilliant.
I know! Stuffing is so expensive. I do find that the “down alternative” pillows that cost a couple dollars more seem to work better than the ones that are a rolled wad of stuffing, but I’ve had success with both. I’m glad you can finish your projects now!
I make and sell petwear and accessories for a living and have made these type of beds and stuffed them with my fleece scraps instead of throwing them out! I make them with a removable cover with just a bit of velcro at the closure seam instead of stitching. My non-front loading customers seem to appreciate that :)
Your Loki looks just like my Mugzy who just turned 15!!!
Great tutorial, LOVE the puppies!!!!
I’m going to try a scaled down version of this for my cats!
LOVE this! Perfect birthday idea for my sister-in-law who just adopted a new ‘fur-child’ (love that too!). Great idea with the pillow stuffing. Have to remember to check at the dollar stores.
Thanks so much for this tutorial! I’m getting a puppy at the end of the week and wanted to make him something to lay on around the house ~ this pillow is just perfect. And, using an old pillow (or new) is a fab idea! Ikea is a great place to get pillows too.
Thanks for the tip about the stuffing!!! I got a 1 1/4 yards of fleece for $4.99 at Jo-annFabrics with a coupon and went over to Big Lots and snagged two pillows for $4.50 (they have a deal for BOGO 50% off). So total price to make this bed for me was $9.50 and my pugs love it a million times more than their twenty something dollar bed!!!
https://i150.photobucket.com/albums/s114/moonoe08/Facebook/Mobile%20Uploads/542938_3176010558782_1221120097_32195531_1216537_n.jpg
https://i150.photobucket.com/albums/s114/moonoe08/Facebook/Mobile%20Uploads/150780_3173643019595_1221120097_32194759_2107839844_n.jpg
The first photo is our younger guy Marcus who was thoroughly enjoying the bed through the night. The second photo is our older gal Tily who immediately knew what I was up too once I started stuffing the bed :P
Oh my gosh, they are adorable! Thank you for sharing! :)
Also, I have two requests already for cat beds! I have a feeling all of the animals in my family will have their own beds! :)
[…] pattern is this super cute fleece dog bed by Erin over at Dog Under My […]
I made these and im only 14! Im selling them, BUT I am doing them differently! :D I am adding a slip on “Pillowcase cover” with a zipper :)
I had purchased a beanbag dog bed that was quite expensive and find that the material is already starting to get holes in it. I wash it often because it has a zipper and liner. I would like to make this but where would you put the zipper? I normally don’t sew.
I would put the zipper on the side of the dog bed, for easy access and easy removal! Good luck!
what size would i make this for a 7 year old?
thanks!
Oh gosh, I don’t know. The circle size is probably fine, but you could make them taller so you could really stuff them. Keep mind my dogs only weigh 6 & 12 pounds, so sinking in they still don’t squish the stuffing all the way to the floor. A kid probably would. You’d have to stuff it really full and it would be more like a floor pillow than a beanbag chair, if that’s what you were thinking. I would probably use 3 pillows not two, then let them sit on it a while to smush it down :) Good luck!
i should clarify – a 7 y.o. child!
This is totally going to be a cat bed! My Porsha just loved squishy beds and her sister Mercedes is the perfect minion for testIng ;)
I am so excited to make a few of these for my silky terrier. I am so excited that I can wash it too.
I just made this beuatiful bed for my litte Sarita, she is a cotton de Tulear. She is very loved and spoiled. I found the picture of this bed in Pinterest and inmediately went to your website. I love your work, you are very talented. Thanks for sharing.
A big hug to you and your dogs from Colombia,
Gaby
This was a great tutorial! Thank you so much!
I just made a big one for my pup. Got fleece for $3.99 a yard on serious sale from JoAnns and filled it with the leftover fabric plus 2 20 oz fiber fill packs ($3.99 each). I made it out of 1.25 yards for the top and 1.63 yards for the bottom/sides. Total for a 54″ diameter bed was $19.47!
This is awesome! Any idea how big I should make the bed (or, specifically, the circles) for a much bigger dog? Our baby is 65lbs…
This was super cute! I made one for my french brittany but made it a little bigger and a little less fluffy for him. He seems to like it! Hopped right on after he saw it. :3
https://tinypic.com/r/k13ywm/6
Thanks so much for the pattern! I’ll be making another one for my other dog before she gets jealous.
Totally love this idea! It’s not yet complete but here’s a picture. My dog doesn’t want to get off of it! :)
Here’s a picture….
https://mail.google.com/mail/?ui=2&ik=3300b7bca5&view=att&th=13841d0abfe0fc11&attid=0.1&disp=inline&safe=1&zw
Thank you! :)
I’ve had a pattern just like yours, and have been making these beds for years. The only difference is that I make two shells; one which is exactly like yours (made with a cheap muslin or cotton) which holds the stuffing, and the outer layer has the added feature of a zipper. The stuffed shell is then inserted in the outer layer; zipped up, and you now have a bed where the inner stuffed bed will last forever, and u just have to pop the outer shell into the washer to clean.
I have eight dogs, and there are doggie beds everywhere in the house!
I’d love to make one of these for my lab who is almost 70 lbs. Has anyone put the measurements together for a larger dog?
I actually made one last night for my 50 lb pit mix. He LOVES it. Instead of a 26″ circle, I used a 32″ one. The two strips for the middle were 9″ high and 52″ long. I followed the directions and it came out beautifully!
My dog has not left it; seriously. It’s about 30″ across and 8″ high. It could definitely fit a bigger dog if they like to curl up like mine.
I used about 1 1/2- 1 3/4 yards of fleece. I bought one of those make your own no sew fleece blanket kits at Walmart since they were only $12. To buy the 2 yards of fleece separately it would have been almost double that.
I hope you get to make one for your fur baby! Mine adores his. :)
AWESOME tutorial!
I made two of these for my little grandchildren. I thought they would be good bean bag chairs for the kids to to set in to watch TV. They love them. I bought the 12.00 dollar a yard flease a on a half price sale. Used some old pillows that I did not want any more for filling. A cheap gilt for the kids and they can throw them around and do anything with them and no spilled bean foan filling to pick up if they rip a seam. Will probably make more for my dog. Ha Ha
I love this tutorial! I will have to modify it a bit since I have a boxer and I don’t think she’ll fit on it quite as well as your dog did. I keep a doggie bed in her crate and I seem to go through them like crazy and they are so expensive. I think I’m going to start making hers from now on. Thanks for the pattern and directions!!!!
The tutorial on the doggie bed is so so cute. I have two mini doxies and
their going to love their new beds. Thanks again for the free tutorial.
Hello Erin, I have a question! Can you please do a tutorial on how to make a round dog bed COVER for this dog bed? I have tried making it but it has been too big for it and I don’t know how to apply the zipper!? I go on your site all the time and love your tutorials! So can you pleeeeeeeeeasssssssse make a tutorial for a dog bed cover for this? Thank you so soooo much!
OK, here’s my concern with a cover/zipper. If you’re making it out of stretchy material, like fleece, you’d have to also make the inside stretchy as well and over-fill it or the cover it going to look saggy and sad. Then, to put a giant ball inside of the giant cover, the zip would have to be the length of half of the bottom of the bed. Fleece + zipper + curves? I dunno.
The beds I made for this tutorial have been washed dozens of times. I just stuff the whole bed in my washing machine. They are starting to get worn out now and I need to make new ones. They aren’t meant to last forever.
Now, if you were thinking about making one out of something other than fleece, then a cover/lining might work. I have trouble finding nice home dec/microfiber type fabrics that I would use for that, plus my dogs really like their fleece beds.
I did make one that was a rectangle with a zipper, although I just stuffed it – I didn’t make a lining for it. I like that overstuffed look and the dogs like not hitting the floor. I could do a basic rectangular pillowcase style bed with a size zip, with no boxed corners. THAT would work with an inner pillow. I see those a lot for big dogs.
I’m also curious, maybe it’s because my dogs don’t shed, but why would you wash the cover and not the inside anyway? I wash my bed pillows all the time too, not just the pillowcases. If my dogs drool/spill/puke on their beds or just get them stinky, I wash the entire thing, not just the cover. It must just be the shedding thing?
Thank you so much for your reply! I have an idea though! Instead of a zipper I am going to sew on strips so I can just tie the cover on! Thanks for your help!
I’ve made zippered beds out of fleece, with the inner covering made out of non-stretchy material, and have never experienced any problems whatsoever with sewing them or washing them. My 11-year-old dogs r still using these beds to today. I just sew new beds for additional rooms, and for additional dogs as our canine family now numbers 9. They r also wonderful gifts for friends who have fur babies.
I am making the bed just as the tutorial is but using sheeting and am going to make an envelope style slip cover out of fleece. the only difference from the tutorial is that you would only need 1 circle for the top and then 2 half circles for the bottom with the straight edge extended a few inches so you can hem them and sew so they overlap…. then you just shove the bed in and it should stay closed. You could always add velcro to the overlap if it wasn’t staying closed. :) Hope this helps.
Here’s what I’ve been doing for two large boxers. I go to the Goodwill store and buy pretty pillow shams in King or the largest sizes. Just fill them or stuff with pillows, etc. and you have awesome dog beds! I have two beautiful tapestry fabric beds right now, that match my livingroom colors.
My friend who raises labs does that, and she will sew two matching pillowcases together. She has like 10 dogs so she’s not buying everyone an expensive dog bed. Great idea!
This sounds like an awesome idea … I will have to look at our local Goodwill store – we have three mini doxies (fixing to have four) …
Huge shout out to you, I am a beginner and I followed your clear instructions ( plus pic’s, thank you) and was able to make this bed in 1 hour…..my Spud is already loving it, I will post pictures soon. I am soooo grateful to you for posting these, thanks again
I need to see a dog named SPUD in his bed. Please post pics. Love it.
My 10-year-old daughter and I made a bed for our puppy, Maccabee, last night. It was our first sewing project ever, and came out pretty good. The only thing we changed is we used 7″ high strips for the sides. Maccabee is still pretty small (only about 7 pounds) and I thought 9″ would be too tall for him.
I think Maccabee likes his new bed. What do you think?
https://instagr.am/p/PGM0AWI2iJ/
AHHH!!! CUTE!!! He’s like, stop taking my picture, I’m trying to nap! :D
I had some dog bone fleece I wanted to make a bed out of and yours looked the most comfy so I finally did it today and I love it! I would like to start selling different types of beds and this one is great. I might go for different filler though so the lumps aren’t there. But for my Peekapoo it will do just fine, thanks so much!
For me lumps depended on what type of pillow I use. The ones labeled “down alternative” and are kind of… squishy? Work way better than the ones that are just a giant rolled batt. But they are also more expensive, so at that point is it cheaper to just buy fiberfill? Probably. Sam likes the squish effect so she would probably also like that shredded foam clusterfill stuff too.
I did some looking online and WalMart has something called Morning Glory Cluster Stuff. Next time I might try that or bean bag filling. In this one I used fiber fill from an old pillow I had. Still love it though!
I just saw this and am so psyched. I have a memory foam mattress that I am going to cut up and use. Best part is it will have that mommy smell for the new puppy.
That is exactly what I did. I had a memory foam mattress pad about 4″ thick. Cut it into 2’x3′ rectangle and made an envelope style cover out of fleece. It is so easy to remove and throw in the wash. I spray Febreeze on the padding while the cover is washing and drying.
I am getting a puppy in a month and I had bought some fleece panels to use in his crate. Then I found your post… Dang it!! Now I want to make a pillow/bed! :-P My puppy will definitely get a lot larger than yours (he’s a boxer), but I was thinking maybe I could modify it and do a low large rectangular shape instead of a tall circular one. I definitely like the idea of pillows for stuffing. Thanks so much for your post!!
Dog beds are specially useful for any dogs since they really love to sleep on it. my dog beds are usually made from cotton. *:””`
Hope This Helps!
https://www.prettygoddess.com
I loved this pattern so much that I made 4 beds for my dogs on Sunday morning. They love them!
I used a cord fabric instead so that they would be really hardwearing and I put my puppies first initials on each of the cushions so they have one each. They look really fantastic.
Thank you!
Bonjour,
je voudrais vous dire un grand MERCI pour votre générosité concernant les tutos,
je découvre ce que vous avez créé et je suis émerveillée.
Je vais essayer de faire un coussin pour ma petite chienne Aglaé, je suis sûre qu’elle va adorer.
Bonne journée à vous et encore Merci et Bravo à vous
Minimique
Can’t believe I just PAID $6 for this exact same pattern. This tutorial has even more detail than the pattern I bought!!
Bonjour je suis française, j’habite à Besançon. I find your dogbed very nice !!
Your dog is lucky.
Je viens de temps en temps faire un tour sur votre blog que j’aime beaucoup. I hope you’ll read and understand my french .
My english is not too well lol.
Have a nice day
Bonne continuation
our dog beds are made up of very soft materials like viny foam. ^
<a href="Most recent post on our very own blog site
https://www.foodsupplementdigest.com/dhea-dosage/
[…] A fleece bed would also be extremely cozy and comfortable. You will have to make the bed from scratch. You’ll need to cut out two circles and some extra pieces of fabric. Sew the long pieces together on the shirt side to make one piece, mark the halfway points on both circles and start sewing. Start with a circle and then add the second one. You should obtain a bed with a hole in the middle. Insert the stuffing and sew the opening.{found on erinerickson}. […]
[…] A fleece bed would also be extremely cozy and comfortable. You will have to make the bed from scratch. You’ll need to cut out two circles and some extra pieces of fabric. Sew the long pieces together on the shirt side to make one piece, mark the halfway points on both circles and start sewing. Start with a circle and then add the second one. You should obtain a bed with a hole in the middle. Insert the stuffing and sew the opening.{found on erinerickson}. […]
I love this bed! And stuffing it with pillows is a great idea. As soon as I can get to Joann’s my dog & cats are going to have new beds. Thanks for a great idea.
[…] Spittin-Toad, Invisiblespray, Erinerickson, Diynetwork, Marvelouslymessy, Mysocalledcraftylife, Camillestyles y […]
I just made a 48″ diameter pet bed for my chocolate lab. I used 2 dollar store blankets and made letters with the leftover material and embroidered his name on it (Blaze). I don’t have any pillows to stuff it so he has a feather tick in it right now but I want to stuff it with cedar chips to deal with the dog smell. I also put a huge zipper (that I reclaimed from a damaged dollar store dress bag) because I want to make an inner bag to hold the chips so that I can wash the outer bag. Thank you so much for sharing this pattern. I plan on making another for his schnauzer friend who visits on a regular basis. She looks a bit like your dog.
Oh my gosh that’s huge!! So fun!
I’m looking for the instructions for big dogs (50-60lbs), I can’t find the link to the other blog you were talking about. Thanks!
Hannah
You’ve inspired me… I’m making one tonight for my 2 little Italian Greyhounds. I am going to try to make mine with a slipcover. ie: making according to your directions out of plain white sheeting then I’m going to make a slipcover out of fleece and one out of flannel so I can change it according to decor and season (winter vs. summer for now but maybe I’ll eventually make them holiday ones too hahahaha). I plan to make the slipcover be an envelope style back so they overlap.
I hope that makes sense. It does to my crazy brain… .anyway I’ll try to post pictures or send them to you when I’m done. :)
[…] found on erinerickson […]
Found this on Pinterest last week. Just made one for our beagle!! Thanks for the comprehensive and easy directions. Ham’s bed came out terrifice!!!
Yay! Also, Ham is a perfect name for a dog. That should be one of Loki’s nicknames. I love it! :D
[…] Fleece Dog Bed – Dog Under My Desk […]
LOVE YOUR TUTORIAL. You did such an AWWWWESOME JOB breaking it down step by step! Its dummy proof :) I followed it, and came out great. I have 2 boston terrier boys and its the perfect size for them, and they LOVE it. I don’t have a blog, but you can see the dog bed on my Instagram- Kelbarron
THANKS SO MUCH FOR SHARING!!!
You are welcome! Yours turned out so cute!! Your pups are totally adorable. <3
Really helpful and in dept tutorial, I totally like it. I will definitely try to make one for my cute doggie, when I find some free time for this and I hope he will like it.
Thank you for making the effort to writhing this long guide :).
Hi, i love this tutorial, i was looking at the ear-bud holder tutorial before then i saw this,i was wondering is you could just so all of the 9 by 44 together to make one long strip and so it to both of the circles. also i was pondering whether or not this could be used as a bean bag just with pillow stuffing? i would love to hear back from you, thank you for your time!
hi, i love this tutorial, i was wondering if you could just sew all the 9 by 44s together and make one long strip, then sew that to the two circles ( strips being the diamiter). i also was wondering if this could be used for kids! i hope to see more soon! thank you for your time!
oops i didn’t relies i sent a post 2 times sorry i thought it didnt send the 1st one so i sent another, oops :)
I wanted to make pillows for my balcony. I think this would be great if I use a different kind of fabric. Thanks for sharing. I will surely give it a try. :-)
Just followed your instructions to make this for my doggie! She is an 8 year old Min Pin/Chihuahua mix and loves to sit under the bathroom counter while I get ready in the mornings. It turned out great! I used old pillows that my mom was just going to throw out. I got the fleece at Jo-Ann (this week Blizzard fleece is 70% off so I paid about 4 dollars), and she loves it! I’m definitely going to have to make at least 3 more to stick around the house for her. Here is a photo:
https://fbcdn-sphotos-c-a.akamaihd.net/hphotos-ak-ash4/999435_10201649401267634_1649382978_n.jpg
Just found your blog this morning, and oh my goodness! My Shih Tzu, Dash, would like to thank you. He is about to get a new bed for the new sewing room (I want my meditation cushion back!) and I couldn’t decide how to do it economically, and your pillow-for-stuffing solution is genius. So, so grateful!
[…] the thing, though. What comes next? Do you actually make that dill pickle dip or those DIY dog beds? If you’re anything like me, the answer is probably, “almost never.” […]
I think Im going to try
Exactly what I was looking for…You can find cute stuff for larger dogs (like they aren’t cute). Going to make with my fleece stash. Thanks :)
Do you know if there are any out there that can be made for the igloo style doghouse and that are waterproof … water resistant?
I would suggest you look at your local fabric store for something for outside furniture. I made a lining for my shopping/utility cart with that type of material and it weather resistant, and washable. I got it at the end of the summer and only paid a couple of dollars a yard for it. Have used it in the cart in all types of weather and washed it numerous times in the past 4 years.
Love it !! I was looking on the internet to purchase a bean bag for my wee westie as she had just finished radiotherapy on her leg and came across your tutorial. I only wish I could sew as I’m sure Carly would love it too. Do you sell the covers?
Wanted to thank you for this tutorial!!!! I have a yorkie bichon mix. He is 10lbs. I modified the pattern to be a little smaller and shorter. Jona just loves his new bed while I’m in the sewing room.
Magnifique, et ce petit amour de chien est très beau, il a l’air très au confort sur son coussin lol – bonne soirée
Thank you so much for this tutorial. I am fixing to make my 4th dog bed using your pattern. It is perfect and my dogs love it. This next one will be a Christmas gift using a snowman fleece blanket, for a friend’s elderly Lhaso Apso. I get my fleece from the fleece blankets from Walmart. Very inexpensive and the dogs LOVE them! Thanks again!!!!
Nice name for your terrier ( Loki ) my terrier name is ( Jökull )Glacier) and his best frends (Loki.husky,Týr and Fenrir labrador)
[…] Cheap Bedding Option If money is an issue then gather up all of your old blankets, dressing gowns and things that you or the kids have outgrown. By placing them in an old box or a […]
I frequently dog sit a very large (standard poodle size) labradoodle. I left out one of our granddaughters bean bag chairs one time and he immediately took it over as his bed (had to remove some of the “bean” to make it more comfortable for him. He loves to be able to mold it to the shape he wants. I would love to make him a larger bed like this and wondered about stuffing it with the beans so he could still work with it. We have two old bean bag chairs, plus the left over from his current bed. The problem would be washing it. I really wouldn’t want to have to take all of the beans out to wash it, but the thought of making a liner is a little intimidating also. Any ideas?
This is brilliant I’m going to give this a try. Though I will make it a strong material and then the fleece one to cover it so I can take it off and wash it on a regular basis ;)
Thanks so much… love the idea… can change fabric w/ the season and easy….
Hello, I love this dog bed. how and where would you advise to add a zip?
It depends on why you want to add the zipper. I honestly would just put the entire thing in my old Whirlpool duet frontloader back home. Now with a tiny washer here in Oz, I understand the need to remove the cover to wash! That said, this type of bed just won’t look right if it’s not stuffed full, but rather just a slipcover or pillowcase. So if you’re going to want an inner pillow, you’ll want to make it with a stretchy knit material and over-stuff it. If you do that you’re going to want to add a zip along 1/3 to 1/2 of the bottom circle.
Otherwise if you just want to be able to pull the stuffing out and re-fluff once in a while, I would just add a zip along the straight part of the gusset. Either an invisible zip, or use this method: https://www.pellonprojects.com/wp-content/uploads/2013/12/SnoozeDogBedProject.pdf
You could also make the bottom 2 pieces and add a seam allowance, and add a zipper straight down the center of the circle.
Keep in mind my pups don’t chew or drool much, and they aren’t given stinky/messy things to chew on like most big dogs. They also always snuggle in blankets on top of their beds, so really I wash these every few months and after 3-4 washings I throw them away and make new ones. The quilted ones, like the snooze bed, are easier to take off and wash all the time. :)
Thank you so much for your advice
You could make an envelope style cover too. That is very easy to make instead of using a zipper.
Add your zipper into the gusset piece before you put the pillow together. I have an old commercially like this that is made out of cord small wale corduroy that has lasted a lifetime. Had to replace the stuffing. It is a 24″ round and accepts a European style pillow insert (from Walmart). I just separate the pillow and cover and wash together. Pillow washes better out of the cover.
I am working on doggie bed No. 4. These are always a hit and fun to make. I wash them as needed and just fluff them up again. Thank you so much!
Hi Erin!
Thank you so much for posting this! I’m in the very early stages of mastering how to make things and using the sewing machine so when I came across this I thought it was a perfect project! I decided to make one for my cat and I finished it yesterday. She absolutely loves it.
I now feel like I want to make another one as there were a few little imperfections with this one, only really visible to me, but it was such fun to make and really quite easy.
many thanks again :-) Jackie
Hi,
Thanks so much for such a great tutorial! I just made one and it was super easy!! All the instructions were very clear and I love how it turned out. Thanks again!
Thanks so much for the pattern and the instructions, especially the math so we can make custom sizes. Commercially made pet beds are so expensive. I was searching for new beds and stumbled on this. I hadn’t even thought of trying to make one.
I bought 2 beds like this 3-4 years ago. $40 each. Nylon (no stretch bottom, wears well). Corduroy material for top and side gusset. Finished size 24″ round, 4″ gusset with a 26″ invisible type zipper sewn into the seam between the side gusset and the bottom of the bed. Fiber fill is inside a liner, same size/design, overstuffed, stitched closed. I strongly recommend using a liner and then a separate cover. Today’s washers (side or top load don’t use enough water to rinse out soap well (I “wash” 3 times, once with about 1 tablespoon soap, and then twice “no soap” to get all the soap out). If you have a separate cover, you only have to wash the cover. I am going to make 2-3 covers for the same bed to alternate for washing/decorating purposes. I’m going to use old sheets for the liners.
I was just shopping for new beds $40-$100 price range, this style is hard to find, most are not this thick.
***Suggested sizing for beds of this style (How to Measure Your Pet for a round bed [this info taken from retail website): First measure the area covered while your pet is lying down, then add 7″). Note: does your dog usually curl up (less room needed) or does your dog like to stretch out (larger bed required)? My 11 lb miniature poodle fits great on the 24″ bed.*** Most round beds range from 18″ (extra small) to 56″ (extra large).
Help – my sewing machine is 30+ years old – just basic stitches, basic presser foot. Can I sew with fleece on this machine? How do I sew a zipper between the side gusset and the round bottom layer, I have never done zippers. I haven’t used my machine in probably 10-15 years. ALL HINTS GREATLY APPRECIATED.
Hi Beth, a zipper is great idea. You can find loads of tutorials on youtube about how to sew them. I would even go and sew it on the bottom and add a piece of fabric to cover in order to prevent from marks on the floor. When using fleece you only have to cut out a long stripe, fix the zipper from left side (using wonder tape for ex.) then sew it from right side.
We are probably going to get a puppy in Decembre and I can’t wait to sew him a bedeutet :-)
I have done an envelope style cover. Mine are rectangle shape, but you could easily do round too. The bottom piece would be 2 pieces of half circles the overlap each other.
Great job!! I love it!! Tjanks for sharing
Wow! I love this idea, thanks!
This is, hands down, one of the best tutorials ever.
I was looking for something fluffy for my little prince… and I’ve found this pretty tutorial! Thanks a lot.
[…] step further, sew a leash and custom collar with this tutorial at Sew4Home. Easy tutorial for this fleece dog bed over at Dog Under My Desk patterns. A sweet, free dog harness sewing pattern at Sew Mama Sew Adorable tutorial; how to sew a […]
Sometimes My dog urinates on the bed. If same thing happens to this bed then how can I wash?
hey Bro do not use ‘urine’ again and again
Add your zipper into the gusset piece before you put the pillow together. I have an old commercially like this that is made out of cord small wale corduroy that has lasted a lifetime. Had to replace the stuffing. It is a 24″ round and accepts a European style pillow insert (from Walmart). I just separate the pillow and cover and wash together. Pillow washes better out of the cover.
If fleece is a problem with dog hair, I had a bed made out of denim that was a different pattern when I had my Shepard mix that was great. I was actually made just like a pillow case with a zipper at the open end.
[…] FLEECE DOG BED From Dog Under My Desk […]
[…] Download Pattern […]