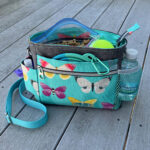
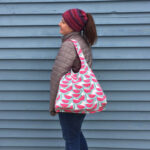
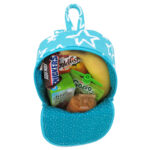
Layout Image
  • Blog
  • PDF Pattern Shop
  • Tutorials
  • Interfacing Tips
  • Pattern Tips
  • About Me
  • Contact Me
 Facebook Twitter Flickr Pinterest Twitter Instagram RSS

Subscribe to Blog

Get new blog posts from Dog Under My Desk in your email!
Click here to Subscribe to Blog via Email

Newsletter signup

Get the latest news from Dog Under My Desk.
Click here to subscribe to newsletter.

Erin’s Instagram


Join the Flickr Group

www.flickr.com
Dog Under My Desk Flickr! Group

Declare your fandom earbud pouches

By Erin Erickson · Comments (1)
Friday, May 24th, 2013

 sgstcover
So, this happened last weekend:

quiltmarketstartrektrend

Quilt Market and Star Trek were trending! I love it when my worlds collide, so I figured it was time to post this. Plus, it’s con season! Are you ready to declare your fandom? Two of my favorites are Stargate and Star Trek (and Sanctuary, but you try appliquéing this.) I couldn’t make a teeny TARDIS, so you can declare you Doctor Who fandom with a wristlet like this one. I made these the right size for the earbud pouch and easily traceable for you. Download the applique template here and refer to the original Circle Zip Earbud Pouch tutorial here.

In additional to all the materials you need for the earbud pouch, you will need:

  • A printed template (or your own design… but you’ll need to print it reversed)
  • A scrap of fabric for your applique design
  • A square of *sewable* paper backed iron-on adhesive like HeatnBond Lite
  • A circle of fusible interfacing

supplies Place the paper backed adhesive over the template, paper side up. Lightly trace the outline onto the paper. I use a pencil, but just use something that won’t smear or come off when you iron it. Ballpoint pen, sharpie but let it dry, that sort of thing.

IMG_5261 Do not cut out the design yet. Place the bumpy, glue side down on the WRONG side of the fabric. If you’re using solids it probably doesn’t matter which side. Make sure the fusible piece is smaller than your fabric. Cover this with a press cloth and lightly press with your iron to adhere.

IMG_5273 Flip over to the right side of the fabric and press well with steam. (This is what I do, but read the directions for the product that you use.)

IMG_5278 With the paper still attached, cut out the piece(s) with the sharpest scissors you own.

IMG_5292 Peel off the paper. You should now have a custom shaped applique with the glue on the back.

stickyback Apply the circle of fusible interfacing to the wrong side of the exterior back piece.

IMG_5312 Center the applique design and place it glue side down on the exterior back piece. Keep in mind that you need a 3/8″ seam allowance and then you will topstitch, so make sure each corner is 3/4″ away from the edge to allow for this.

distancefromedge

If you have tear away embroidery stabilizer, place a square behind the fabric. Use a sharp needle like a Microtex 80/12 or an embroidery needle for this. I always go for a thread color that matches the applique. You don’t have to but it will stand out if you don’t, so you’ll need to be more careful. My second choice would be an accent color, rather than matching the background fabric color. I like to use a narrow, short zigzag stitch. You could use a satin stitch or a blanket stitch too. The important thing is that you cover most of the raw edges of the design. A good zigzag stitch length is between .3 and .8 with a width of 2.5.)

Start with the needle in the right side position, and lower it down right where the edge of the design meets the fabric. Start sewing slowly and go all the way around, pivoting and the corners. (Click to enlarge.)

stabilizer  needledown

Taper your stitches to the edge by narrowing the stitch width. Hand crank the last few stitches just to make sure they are where you want them. Stitch all the way back around to where you started and overlap 2-3 stitches. Pull all of your threads to the back and tie them off.

IMG_5338  IMG_5381

You can see how I used a shorter stitch length for the one on the left, and a longer stitch length for the one on the right, but the same stitch width. Now you can tear away the stabilizer if you used it.

IMG_5383

To stack them so the symbol is right side up when it’s hanging from the loop, assemble with the tab at the top. Layer with the appliquéd piece right sides together with the zipper, cover with batting and then place the lining piece right side up on top.

IMG_5440  IMG_5443  IMG_5445  IMG_5450

Make sure you topstitch outside of the applique. Clip on your bag and go!

IMG_5502  DSC_5518
Which would you choose? Command? Operations? Sciences? Camo or blue for the puddle for Stargate would be fun. My friend wanted a pink one, so anything goes! Fat Quarter Shop has every color you could possibly want and zipit probably has every color zipper too.

The two on the right are mine. :D

IMG_5470  IMG_5486 

Comments (1)
Categories : Earbud Pouch, Tutorials

April Customer Flickr Finds

By Erin Erickson · Comments (0)
Tuesday, April 30th, 2013

You are all so busy sewing! I’d really like to make this into a more regular feature, at least once a month (check out the last one!). Make sure you’re uploading those pics and adding them to the Flickr group, tagging me on Instagram or linking back to my blog (I tend to get an email) or posting them to my Facebook page! Feel free to add your links in the comments too or email them to me! The website is getting a facelift soon and I’d really love to be able to link to those of you making and selling my bags! Everything clicks through to the sources so go on and click and make new friends! :) This AMAZING Sammy Bag was the reason I wanted to do another one of these posts. I’m in love with it.

P4110159

Sammy Bag by JanetMoilanen via Flickr

Then we have Jessica’s pink and blue bicycle Two Zip Hipsters!

Two-Zip Hipsters #1 & 2 by jmdiettrich via Flickr

This little guy by Susan is adorable, using a modified version of the Circle Zip Earbud Pouch.

105a

by Sirelroka via Flickr

Does anyone else wish they had a bench like this to take pictures on? This Two Zip Hipster by Heidi is awesome. Love the fabric.

Tsuru Two Zip Hipster

Tsuru Two Zip Hipster by fabricmutt via Flickr

I love these wristlets by Krystal!

The essential wristlet (L)

The essential wristlet (L) by phantom0919 on Flickr

the essential wristlet by phantom0919 on Flickr

This Mini Daytripper is awesome in this fabric from smallfields411 on Flickr!

Mini Daytripper - Front

Mini Daytripper – Front by smallfields411 via Flickr

Check out how Beth Strand took my pieced Police Box tutorial and turned it into a Tardis Mug Rug. I want that Tardis mug too!

tardismugrug

Tardis Mug Rug by Beth Strand

Then there is all sorts of fun over on the Facebook page! Rene from Sew Much Cuteness made the hipster on the left and one by The Practical Mom Shop is on the right!

hipster1 hipster2

And then Daytrippers by Kathie on the left and Jessica on the right!

daytripper1daytripper2

I wish I could add everyone’s but this post would be a mile long! Go ahead and add yours in the comments or wherever so I can have some to post for May. :D

Comments (0)
Categories : Flickr Finds

New feature – Blog subscriptions and a pattern sale!

By Erin Erickson · Comments (40)
Sunday, April 28th, 2013

Hi!

<– Did you see that I added a blog subscription over there? (Also here.)

I’m terrible about sending newsletters and I tend to send them only when I have a new pattern. This way you can get blog post updates via email and know about sales and new tutorials without waiting for me to trudge through writing a newsletter. Yay! So sign up for the newsletter if you want me to bug you occasionally and sign up for the blog subscription if you want every post delivered via email.

sale20off

I also think it’s time for a sale! As you well know, I rarely do this. My patterns are priced to compete with other PDF patterns, in the $6-12 range, even though my patterns have super detailed instructions with dozens to hundreds of photos, depending on the pattern. The six-plus weeks I put into prototyping, creating computer generated pattern pieces, pattern testing, photographing and writing instructions are a bargain at $10-12, especially considering you also have me to answer your questions you email/tweet/FB me along with all of my free tutorials. So, promotions and discounts are rare. But, I need your help because I need some motivation right now. I went out of town for a family wedding and my whole life got turned upside down – packing, unpacking, sleep schedule getting even more off than usual, airports messing up my still-healing arches… and then my new Bernina 750 had a whole list of issues that needed to be fixed and 2+ weeks later it is still at Bernina. I got my old machine out and set it up, and the instructions for the backpack pattern are already mostly written but I need to sew one to take all the photos and then do the layout of the pattern and get it to testers.

So, I’m having a 20% off sale through midnight (CDT) Wednesday, May 1st, *but* the catch is that I need you to prod me along a little bit with this backpack pattern because my brain is bursting with fun new ideas that I can’t make that until this pattern is done. So go get whichever pattern you don’t have yet, and then leave me a comment? Happy, motivating comment emails (or funny, threatening ones) will help me along. I think the warmer weather will help too!

Click here for the PDF PATTERN SHOP 

Star Wars Backpack (Fabric by Camelot) – Pattern coming soon!

IMG_4983  IMG_5034
Here is one of the new ideas I spent way too long making to procrastinate working on the backpack pattern. These are the fun things that will come next! Not sure if it will be a pattern or a tutorial but either way, it needs to happen, right? :)

Comments (40)
Categories : PDF Patterns

Working on a formula for gadget sleeves

By Erin Erickson · Comments (6)
Wednesday, April 17th, 2013

Forever ago, I started making gadget sleeves. I even started a pattern and did a ton of math to come up with a long list of sizes for like 14 different devices. Then iPads and Kindles kept changing sizes. Then every other electronics company came out with a differently-sized competitor to iPads and Kindles. Then came all the bulky protective cases to put the devices in… so that pattern got put on hold and I worked on The Essential Wristlet.

DSC_2323 DSC_3319 DSC_3339
Anyway, a few weeks ago a couple of my friends got new gadgets: a baby laptop and a tablet. They sent me dimensions and I somehow extrapolated the dimensions from the MacBook Air case I’d made. Not knowing if I’d even written those down correctly, I mailed off two sleeves that I hoped would fit!

And they did! I am a little bit in love with Soft and Stable. You could do the same thing with batting and interfacing but the foam is soooo nice.

“Turtles are EPIC” laptop sleeve. Smaller pouch is made with my no-raw-edge tutorial here. I didn’t have a longer zipper, so I ended up putting the zipper on the short end. Which works out well because we both have the same Vera Bradley backpack (LOVE IT!) and it makes it so easy to get the laptop in and out of the sleeve without taking the entire sleeve out of the bag.

IMG_4562

IMG_4545  IMG_4586
 Dinos tablet sleeve with a grabby hands (jazz hands?) T-Rex

IMG_4619

IMG_4601  IMG_4597
While neither of these were apple or kindle products, they were just as thin. I need to try some with cases or some slightly thicker devices to check the formula and then I will write the pattern for it! I was thinking optional front pocket, but then it’s not really a sleeve you can slide down in your bag if you have a power brick stuffed in the pocket. Are there any additional features you would like to have? The idea would be that you’d then put the sleeve inside another bag, like the Daytripper or a backpack, so it wouldn’t be a laptop/tablet bag in itself, although you could always add a strap. The zipper is a different technique than The Essential Wristlet because this way you can open the sleeve up all the way. Using tabs, you would have to make the sleeve at least 1″ wider than the gadget, which makes me sad. What do you think??

Comments (6)
Categories : Sewing

Last Minute Travel Series – Handle Wraps

By Erin Erickson · Comments (2)
Monday, April 15th, 2013

The worst part of having a boring black bag is that everyone else has a boring black bag. The 29″ suitcase I had was way too big and heavy, so I bought a fantastic 25″ purple bag for my last trip and put a teal luggage strap around it. That was great for spotting on the belt!

Suitcase800ArrowTwo new bags was out of the question, but my smaller bag worked as a carry-on for Southwest. (Do they even check? American Airlines put every bag in the sizer and took most of them away, Southwest let people take giant bags on without a second glance.) So I made luggage handle wraps! Michelle wrote a tutorial for these back in November. She repurposed her luggage handle wraps to make cord wraps, but the instructions are the same. Go check out her post for instructions! I cut mine to about 5″ x 6″ for the big handles on this bag. They only use scraps, so just measure your handles and wing it! :)

IMG_4860 (1)  IMG_4868 IMG_4873  IMG_4893

Now I need to make some bigger ones to go around the cords of my flat iron and curling iron!

Comments (2)
Categories : Sewing, Travel Series

Last Minute Travel Series – Easiest Travel Blanket

By Erin Erickson · Comments (2)
Sunday, March 31st, 2013

This is so easy, but the travel blankets out there are expensive and I’ve mostly seen poor materials (one of them felt like a microfiber cleaning cloth?) and boring colors. So, I made my own. :) I’ll probably use this more in the car than on the plane, but it rolls up really small so it would work in any situation!

IMG_4509

I started with a yard and a half of “micro-fleece”. This stuff is kind of half way between polar fleece and minky softness-wise, and it’s super thin which is what I was going for. And 1.5 yards at 50% off was only $10.50, so about the same price as the cheapest travel blankets that I found and way cuter and softer!

IMG_9422

Sweatshirt fleece would work too or any other fleecy fabric or even a thicker knit fabric. Keep in mind we’ll be hemming this so that it remains a single layer, so just make sure it’s nice on both sides.

1.5 yards of 60″ wide fabric is approximately 54″ x 60″ so it will end up about 52″ x 58″ finished. Perfect for travel size! Try to square up (not easy with fleece, and it doesn’t need to be perfect) and trim off the selvedges.

IMG_4396

Once you’ve got it trimmed, fold it in half and half again, so it’s a big 30″ x 27″ rectangle (sorry this is too big to show). Then fold it in thirds towards the middle. (Or fold it however you’d like, but you’ll need to fold it that way each time!)

Blanket1

Roll the blanket up starting with the end with all folded edges.

Blanket2

Take your elastic and measure around the rolled up blanket, then mark the middle of the outside layer with a pin or chalk. This is where you’ll attach the elastic later.

Blanket3
 Wrap the elastic around as tight as you want it to be when you’re all done. Add 2″ for seam allowance.

Blanket4

Trim  a 3″ triangle off the corners off the corners to make it easier to fold without so much bulk.

Blanket5

Fold all the edges 1″ to the wrong side, then fold 1″ again to enclose the raw edge. Pin or clip this in place.

Blanket6  Blanket7

(I don’t actually fold the whole thing at once, I fold a section at a time right before it goes through the machine. Otherwise I get stuck by pins!)

Sew all the way around with a decorative stitch, wide zig zag or long straight stitch. I sew this with the folded side up. (A walking foot helps but you can manage without it, just go slowly.) Start with the mark for the elastic, looping it and sliding both raw edges under the hem.

IMG_4480

IMG_4470I used a wide, long triple zig zag stitch.

IMG_4491 Now try to remember how you rolled it up the first time! :)

IMG_4509

Comments (2)
Categories : Sewing, Travel Series
Next Page »

Sponsors

http://www.fatquartershop.com/
http://www.etsy.com/shop/fabrictree http://tantalizingstitches.etsy.com http://www.zipit.etsy.com http://www.e-junkie.com/ecom/gb.php?cl=76235&c=ib&aff=229449
Become a sponsor!

Recent Posts

  • Declare your fandom earbud pouches
  • April Customer Flickr Finds
  • New feature – Blog subscriptions and a pattern sale!
  • Working on a formula for gadget sleeves
  • Last Minute Travel Series – Handle Wraps
  • Last Minute Travel Series – Easiest Travel Blanket
  • Last Minute Travel Series – Travel Pillowcase

Archives

Dog Under My Desk
Copyright © 2013 All Rights Reserved
iThemes Builder by iThemes
Powered by WordPress