September is National Sewing Month. So here you go! New tutorial! Go sew. And go buy some fabric and zippers and such from my amazing sponsors over there. —>
I’m breaking my no-raw edges rule again. Under protest. But these are just so easy and some of you are still afraid of zippers and I’m determined to fix that. I’m tempted to post a version of a front-zip pouch that does not have any raw edges. Comment if you want it!
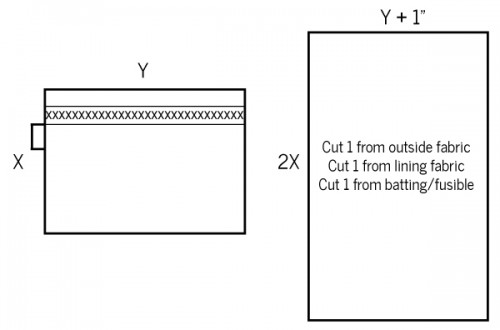
You can make these any size. Here’s the basic formula for working that out. I’m going to make the one for this tutorial coin-purse sized. I have one that is about 7×5 that I use for my inhaler, medicine and hair elastics in my purse so they don’t get lost and it makes it easier to switch purses daily like I do. You could also make them really big and use them for packing, makeup, pencils, kids stuff… whatever, really.
They don’t need to be quilted. I’ll post some alternatives soon but I want to get this up.
Decide your finished size first. I want mine to be 3″ tall (X) by 4″ wide (Y). So I’ll cut my fabric 6″ tall by 5″ wide. It’s not perfect but it’s pretty close.
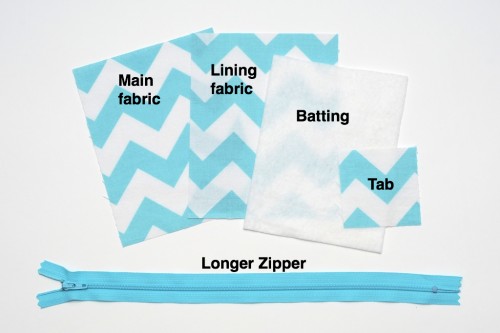
Cut one from each of your main fabric and lining. I just used the same fabric for both since it’s such a small amount. Then cut one piece of thin batting 1/4″ smaller overall and a 2.5″ x 2.5″ tab. You will need a zipper at least 2″ longer than the width of the fabric. Way longer is better.
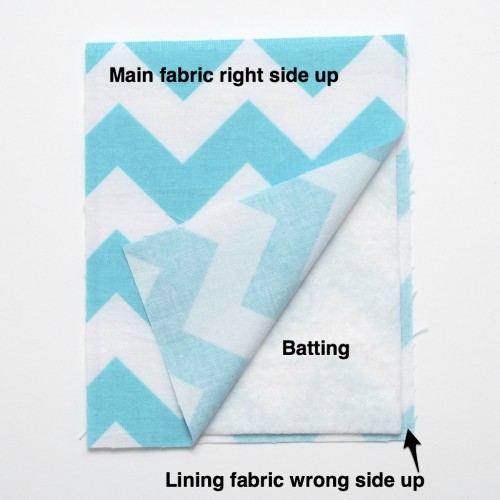
Sandwich the two pieces RIGHT SIDES OUT with the batting in the middle. So lining is wrong side up, then layer the batting, then place the main fabric right side UP. Wrong sides both facing the batting.
Quilt! I usually choose fabrics I can follow the designs on, like these Chevrons or the Ta-Dots, or I just do straight lines. And yes, you’re supposed to cut quilted stuff bigger and then trim. You can do that if you want, but it should be fine. Trim any threads and if it gets all wonky you can square it up.
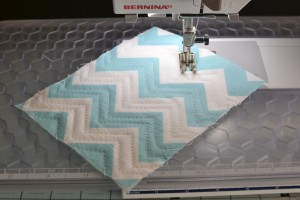
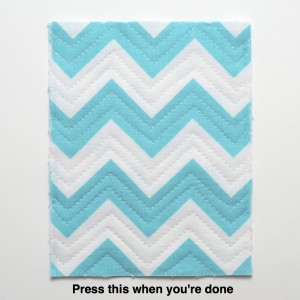
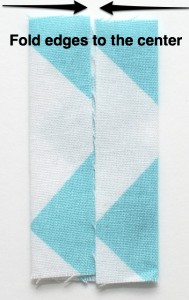
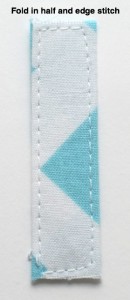
So now you should have one quilted piece. Press it really well, and while you’re pressing fold the tab in fourths and edge stitch. Set that aside for now.
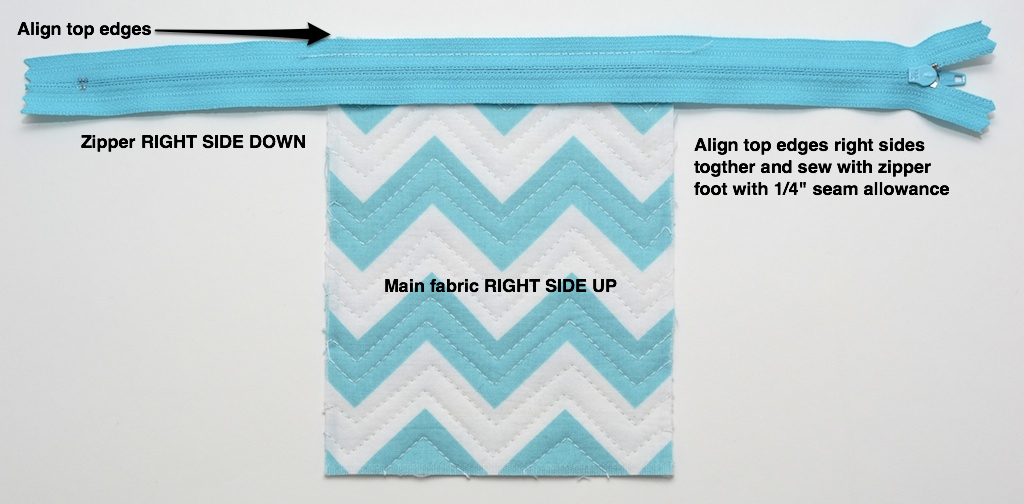
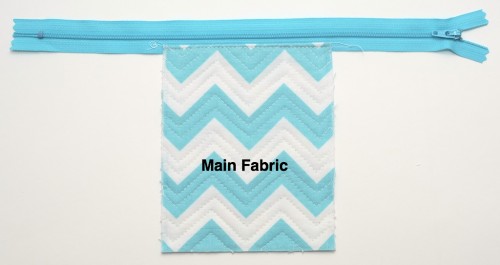
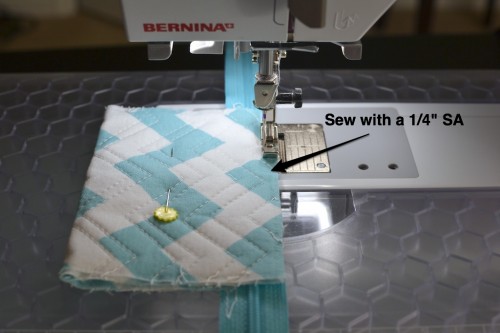
Now, the zipper. Ready? Align the top edges, right sides together as shown and sew with a 1/4″ seam allowance. Use your zipper foot if you have one.
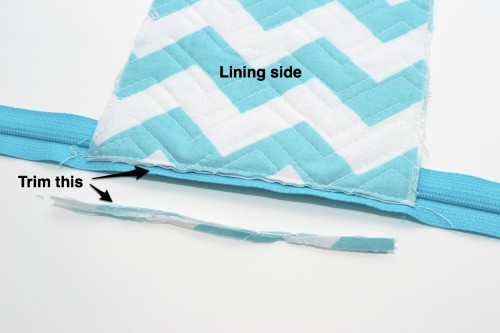
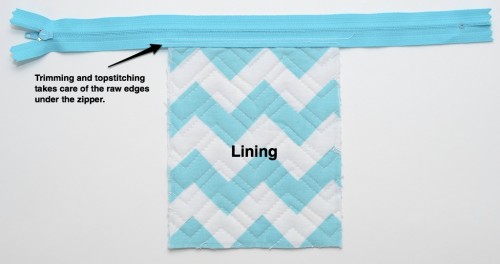
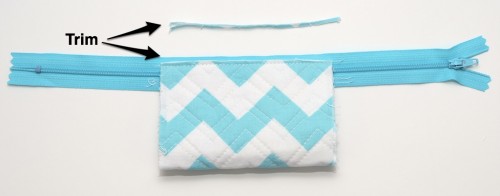
Now flip it over to the lining side and trim away half of the seam allowance. Then press the zipper back – be careful not to melt it.
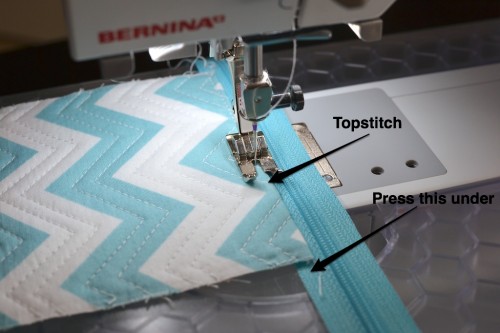
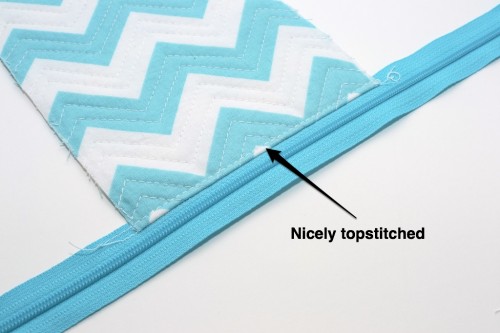
Topstitch the fabric next to the zipper.
Yay! One side done!
Flip it over and you can see why we trimmed that seam.
Now, place it back right side up.
Now fold the bottom edge up to meet the top edge. The main fabric should all be in the middle right sides together and the lining will be showing. Pin it in place.
Sew with a 1/4″ seam allowance.
Trim just like you did with the other side.
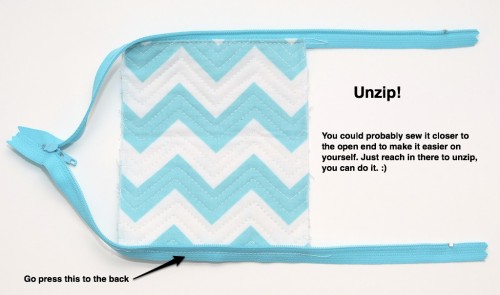
OK this is kind of trick on this little one, but you can do it. Reach through there and UNZIP. All the way. Then press the zipper to the back side.
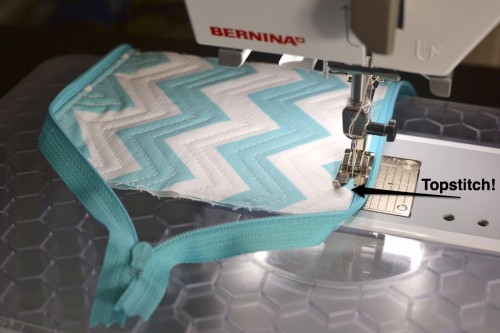
Topstitch the second side.
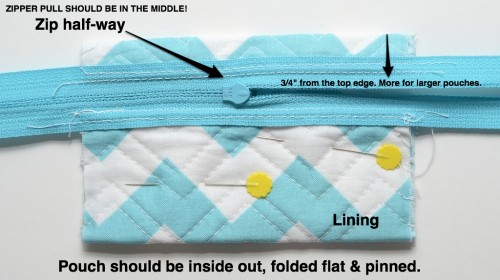
Turn the pouch WRONG SIDE OUT – LINING SHOWING.
Fold it flat and zip it half-way. The zipper pull MUST BE IN THE MIDDLE. Do not cut it off! :)
On this little one, the middle of the zipper teeth are about 3/4″ from the top. On a larger pouch I would make it an inch or more. Just play with it right side out until it looks right and then measure it before turning it inside out.
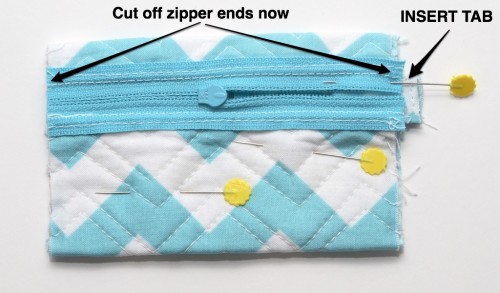
Now cut off the excess zipper. Fold the tab in half and insert it at the open end of the zipper, raw edges sticking out a bit. If you’re adding a D-ring, add it to the tab before you stick it in there. I’m going to add a split ring at the end. Or make your tab wider or longer and don’t add a ring. Whatever you want!
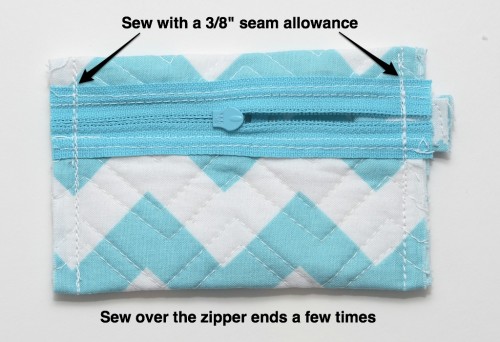
Sew down both side with a 3/8″ seam allowance. I do this a couple times, and backstitch over the zipper ends a couple more.
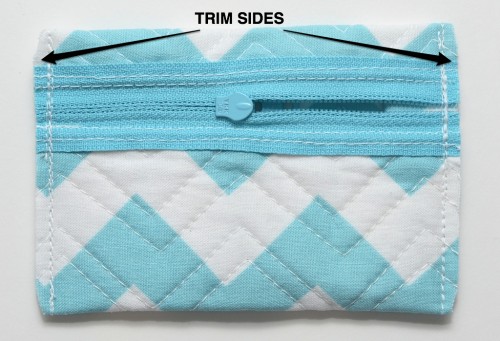
Trim those sides to just under 1/4″.
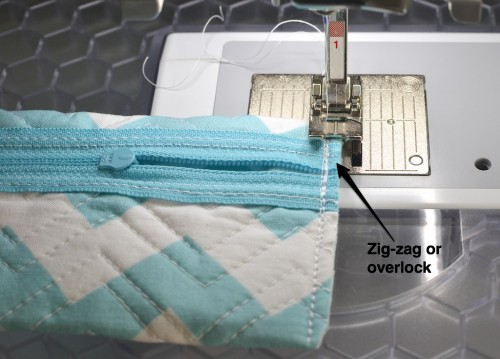
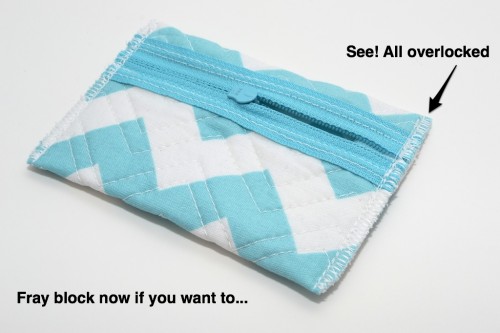
Overlock or zig-zag the edges. I have a #2A overlock foot for my Bernina. You probably don’t. Just use the zig-zag foot and set it to the widest setting and use a short stitch length. It’s OK to let the right side of the needle go off the edge of the fabric.
If you want to add fray block to the open edge of the zipper, do it now.
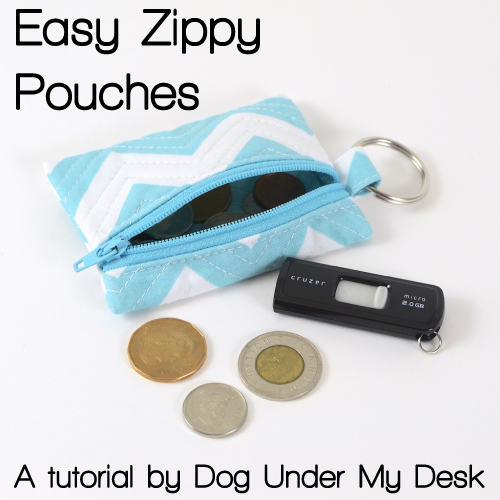
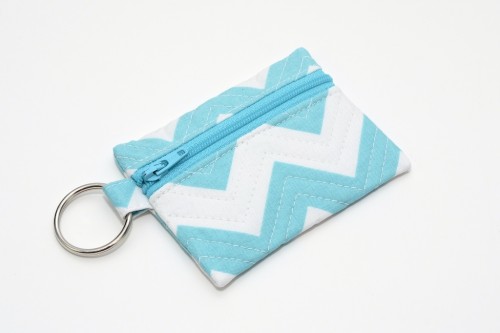
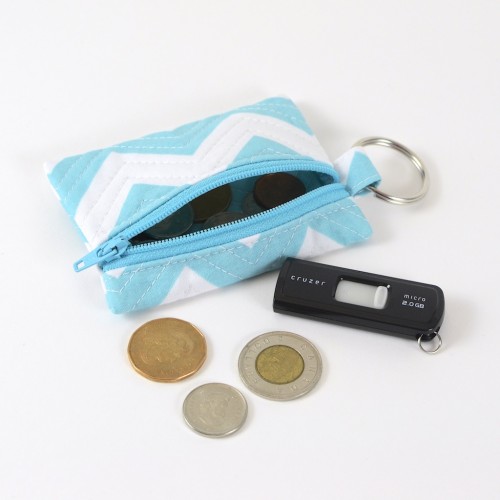
Turn it right side out and PRESS really well. Use steam. Don’t melt the zipper. Add a split ring. Here’s some Canadian coins because I don’t have any American coins in my sewing room. And a flash drive for scale. Yes, I’m a dork. I thought we’d established that? :)


Mighty fine little tutorial that makes me want to try it right. this. minute. Yep, it makes the omg, not a zipper, ahhh, feared one feel pretty good to do it. Tomorrow.
Bookmarked and ready to rumble in the bright light of the day.
Thanks for this. :D
Ha! Did you make one? :)
Going to make one tonight, I think. Need to pull fabric and see what I have. Mwah!
Great tute! You make it look so painless. Now bookmarked and can’t wait to try a little bag – they are just sooooo dang cute! I’ve been ‘reorganizing’ my computer bag with my little cord keepers….but just thought yesterday, I really needed something for my flash drives (and I’m sure if I dig around, I can come with the C.coins…lol)…such perfect timing! Thanks ever so much!!!!
They are *perfect* for this. Make them all with different fabrics and you’ll never be hunting for things in your bag again. Except your phone. Somehow unless I have my hipster with the front pocket I can still never find my phone! Does this happen to everyone? Just me? OK.
Yes, I would like to see a version of the front zip pouch with no raw edges. I’m not afraid of zips, use them all the time, but am always looking for different ways to sew them. :)
I figured it out tonight. I kind of had it in my head but I figured it out. You can’t make them quite as tiny, though.
Yes – ME too!
Do you mean NO raw edges at all (zipper & sides)? I’m stumped. I’d love to see it. Hiding the zipper edge is easy. How do you hide the inner side seams and still keep the zipper on the front panel?
You can do it. There is a trick to it and you leave an opening in the lining and turn and topstitch it. I’m not sure it makes it any cuter doing it that way, though. And I say that even feeling how I do about raw edges. But I will explain how to do it. I have literally hours of work left on the wristlet pattern. Then.
Thank you for publishing this. Can’t wait to try it out. I would love to see a version with no raw edges!
Thanks for another great tutorial!
So simple yet so cute! Yep, let’s see the no-raw-edges one! :) And you are anything but a dork!! :)
Oh no, I am totally a dork. Fangirl, geek, dork. But I’m in good company so whatever. :)
How can I gettheone without raw edges?
THIS IS A GREAT PROJECT AND VERY GOOD DIRECTIONS..
Thank you Aunt Kathy. I will come show it to you soon. :)
Gorgeous! I was going to say Yes, Please! to the no-raw-edge one but this one seems so simple and the raw edges are not that big of a deal, and you could always cover them with some binding! But then if the no-raw-edges one is just as simple then that would be good too :)
It’s not so much less difficult but different. I’ll post it after I finish the wristlet pattern. If I ever finish the wristlet pattern…….
Love your easy tutorial!! I am away but I will make one when I get home :)
I also made your circular ear buds holder for my daughter, she loves it!
Plus, it was really easy to make with your directions.
Yes, please make a “no raw edges” version!!
Coming soon!
[…] Erin from Dog Under My Desk shares a tutorial on her blog showing how to make her Easy Zippy Pouches. The zipper is set into the flat side of the pouch (rather than across the top seam), and it has a loop so you can attach it to a keychain. Or, add a swivel hook and a wrist strap and you’ve got a cute little wristlet. Go to her tutorial. […]
Thanks for the great tutorial and inspiration. I just finished making two zippered pouches; one a small version for my credit cards, the other a much larger pouch with a wrist strap. I posted a bunch of photos and steps of the making of my pouches on my new blog.
I used a fabric that had lots of stylized dress forms on it so I folllowed your idea and I quilted the layers by stitching along the outline of each dress form.
These are so easy to make and they are so practical. They would make great gifts…I’ll be keeping my eye out for fun graphic prints that my friends and family might like. (ahhh, another excuse to go fabric shopping! Ha ha)
CUTE idea. I can’t free motion to save my life, so that sounds really cool to me! Post your link so we can see!
Canadian eh? love the pouch.
Funny. Yes. I saved all my Canadian money from my trip in June for my trip in October. Call it a perfect savings plan, since I can’t spend it here! :D
That’s a cute zippy – love the addition of the loonie and toonie, lol! I too would like to see a no raw edges version – I love making zipper bags that are finished nicely inside :)
Canadian money is fun.
Your tutorials are beyond awesome and great. Thanks so much for sharing them. They are so detailed that even I can do them. The pictures leave no questions whatsoever. I was afraid of the zippers but no more!
Yay no fear! :D And thank you!
So cute! I love the fabric too. Can’t wait to make one of these up (or two, since I know my daughter will want one when she sees how awesome mine is!)!
Thank you! Yes, better make lots of them. :)
I love your tutorials! You do the best job of explaining and illustrating steps. Thank you!
Thanks for reading!
Thank you so much for this tutorial. I have been really scared of zippers, but now I really want to try it! I have been wanting to do something like this for a long time, so practical with many small bags for different stuff you need to take with you, or all that small stuff you have laying around at home. And I really need more pencil cases :)
So thank you, I will try this soon :) I even have some zippers laying around haunting me ;) But no more!! :)
Don’t be scared! The worst that could happen is you need to put a new needle in your machine and throw away some scraps of fabric. Try try try!! :D
Just tried it. Got a cute little bag. But broke a needle overlocking the sides because of the zipper. So note to self, don’t overlock over zipper. How do you get your corners so nice?
Oh no! What size needle were you using? I try to slow down when I do that part. I don’t *usually* break them when I use 80 or 90 needles, 90’s are better. You could even use a denim needle if you are worried about it.
I followed your tutorial to make a patchworked version for my tablet device. Turned out beautifully— your directions and photos are excellent! Thank you for being so generous with your creativity!! My daughter wants one now for her Kindle, my son wants one for his coins, etc.—more fun to be had at my sewing machine, oh darn! Thanks again!!!
Cute! Did you post photos? I started making a pattern for a top-zip open-wide pouch style for gadgets but the darn gadget sizes keep changing. So I’ll need to perfect my “formula” to come up with your own sizes based on the device and then I’ll make that pattern. :)
Coins are perfect, as a flash drives and honestly? Earbuds. As much as I like the round ones for their *OMG CUTE*ness factor, a tiny rectangular one is faster and you can make them to also fit Nanos and Shuffles. I’m thinking gym bag? :)
[…] Who doesn’t love an Easy Zippered Pouch? […]
I HAVE to do this TODAY! I picture a wonderfully neat purse with all these little zip pouches for all my “junque” in the bottomless pit! Thanks ever so much!
Hi,
Exactly what I was looking for! My daughter needs something like this for school, when she has to carry her money for lunch, she has no pockets in her school uniform. I might make the tab half the width and longer so she can put it around her wrist.
I can’t wait to make this tonight! your tutorial is really well done, clear instructions and pictures.
Thanks!
Wow, This is a brilliant tut.
I can’t wait to follow along & give it a go!
That foot in the overlocking picture looks like a Bernina. Is that an overlocker or did you use a special stitch on your sewing machine? I’d love to know since I don’t have an overlocker but a Bernina 530.
Cheers
dxx
I have a Bernina 230 (recently replaced by the 350). That is not the overlock foot in the photo, because I assume most people don’t have them. It’s just my standard zigzag foot (the other feet are the zipper foot and the 1/4″ foot.) I do have the #2A is the overlock foot for my machine and I LOVE it. You can fake it using the zigzag foot by placing the edge of the fabric at the edge of the opening in the zigzag foot and just using the widest zigzag stitch available. When I do it properly, I still use the widest stitch but I decrease the stitch length a bit and line up the edge of my overlock foot with the edge of the fabric. I have a few different overlocking stitches on my machine. The 530 will have even more options. I think it’s a “break out your manual or stop by your dealer” situation, since I’m not familiar with the whole line. Google probably knows too. :D
Hi Erin, I’d love to see the tute for the one with no raw edges, they are a pet peeve of mine too!
Hugs
Naomi
Just made one! Getting ready to make another. I love the easy but very nice small touches that make this pouch extra special. My daughter LOVED it, said “is this mine?” Thanks for a great tutorial.
Love the pattern…. is there a way to print it out?
What a great tutorial, thanks so much!
[…] used this tutorial for a zippered pouch to make the bag. It was vey straightforward and took about an hour. It was […]
I have made a BUNCH of these now. This is an awesome tutorial. It really taught me a lot and they are the cutest little pouches. Thank you!
Just want to thank you so much for the tutorial! I recently made a quilted purse for myself and I made one of these little pouches only I altered the size to fit my phone. Just what I wanted for when I’m taking the kids to the playground and all I want is my phone and keys! I’m in the process of making a bunch more for gifts.
I just placed an order for a bunch of zippers from ZipIt on Etsy. Great shop! Thanks for the recommendation. Her prices can’t be beat! Do you happen to know of any similar shops to buy high quality thread (like Gutermann or Mettler)? I’ve been trying to find online places to buy at discount prices, but I haven’t found any yet. A lot of sites “say” discount or wholesale prices but, when it gets down to it, their prices aren’t any better than JoAnn Fabrics. Actually, if I have a coupon or wait until a 50% off on thread sale, then JoAnn’s beats them. I just want a place I can purchase a lot all at once and not have to make lots of little trips to the store bc I ran out of some particular color. I find the smaller spools of Gutermann run out too quick. I’d like to buy only larger spools that JoAnn doesn’t always have in stock. If you know of any suppliers, I would love it if you could pass that information along.
Thanks again!
[…] making quick makeup bags or coin pouches, I still say you can’t go wrong with how quickly the Easy Zippy Pouches go together. That said, these are pretty quick and easy to make too. I will simply give you both […]
[…] For those of you who sew, this tutorial shows how to create custom-sized zipper pouches. This is a great tutorial, even for novices! From Dog Under My Desk’s “Easy Zippy Pouches” […]
I made one. Your tutorial was super easy to follow and very clear. Thank you!
https://desdemona20.wordpress.com/2012/12/21/a-moment/
My little pouch fits my headset and my little external battery for my phone :-D
That is so cute! I’m glad you liked it!
Ya me hice uno! Gracias!!!
Made one of these for a friend this weekend, and it turned out sooooooo cute! Sent hubby to the store for more o-rings so I can make more for all my friends. Thanks so much for the excellent tutorial.
[…] dão conta sem choro. Eu curti muito a dica e vocês também vão. O passo a passo está aqui no Dog Under My Desk, […]
I just made one of these to match my Two Zip Hipster. You can see it here:
https://pinterest.com/pin/192528952792700128/
I forgot to watch my directional fabric – it’s “right side up” on the back of the pouch.
This one is 3.5″ x 4″ to hold loyalty and gift cards. I’ll be making a larger one to hold receipts and such.
Erin’s tutorial was fantastic, always! :-)
I love is tutorial! I’ve made a few now, and just tried one with oilcloth and it came out adorable! Thank you so much for is great pattern!
Thanks for this pattern ! Very simply & cute ! ^^
You are welcome! Careful or you’ll become addicted… :)
Hello, Thank you so much for your tutorial, I just made a pouch for my mother as a birthday gift! It was really easy to follow and the pictures were ideal. Thanks again! Caroline from Montréal, Québec, Canada
Thank you for your beautifully presented tutorials. The quality of the photos, the clarity of your explanations and the cute fabrics are really motivating to beginners like myself. Your foolproof tutorials have helped me to produce some really neat-looking gifts. I love to drop by your blog when I need cheering up!
This is a lovely little pattern – very quick and easy to put together. I made the same size as you and I can fit in a credit card and some coins. I particularly like the way the zipper hides the raw edge – very clever.
I have also made your round pouch and will be including links to both of these tutorials in the Across the Pond Sew Along for September 2013. Thank you for some nifty patterns.
I just finished my first one…have got to make some more – they are really really cute and fun to make! Sharing mine asap for the Across the Pond Sew Along on Flickr.
A great read till a mention about how i might not have an overlock foot for a/my bernina, and no american coins. *waves bye*
LOL OK I’m hoping that’s sarcasm? I was not going to write a tutorial requiring you to have a $35 foot when you don’t actually need a $35 foot. But if you do, use it!
Canadian coins are cool. My readers know I’m American, hence the comment. Anyway, thanks for the laugh!
Great tutorial! I used it today to teach a class, we went step by step, following along and it turned out perfect!
Thank you for sharing!!! I done my pouch… the tutorial is awesome. I’m going to put my loonies and toonies.
Thank you for this tutorial! You are a great teacher. Not only must you sew but you must teach!
I am brand new to sewing and count myself lucky to have found your site. I immediately made one of these and it look awesome. Get Carded is next!
Thanks again. Don’t stop!
Thank you for the wonderful tutorial! I am always looking for items I can make and donate to our church bazaar. This will be a great item to sell!
Thanks for the tute! Your instructions are easy to follow. Also I never knew how to figure out the measurements for the size purse I wanted and now I do!
I just made four, out of scraps! Thanks for the great tute!
I’m trying to come up with a gift idea for a high school golf team and you may have come up with my solution! They’ll be headed to Divisionals soon and this would be a fun thing to give them. They could hang them on their bags to hold golf tees or money or use them on the bus for headphones, etc. I’m going to have to try one out and then decide if it’s easy enough to mass produce. I’ll need about 12 of them for the whole team. I’m excited to give it a shot!
Tomorow I will make it. Can’t wait..
Why make such an easy bag so hard,which so many steps?
Hi Pat!
Breaking this down into so many steps made it so easy for me! I have literally made over 50! Party favors, teacher gifts, Christmas presents. The dog under MY desk ate the edge off of one, so I flipped it inside out and sewed a new seam. Easy peasy!!!! I love this pattern and tutorial!
What a good tutorial. Made the item yesterday. Perfect!
I love your tutorial! Since you have a dog under your desk, I think you can understand my excitement when I tell you that I am going to modify this to hold doggie poop cleanup bags! I’ll just create an opening for the bags to be pulled through before I close it up. My old bag is shot and I don’t like the hard plastic ones that they sell nowadays. Yippee!!!
Thank you for the great Tutorial, Erin. It was just what I needed! And I have a second in the planning already.
I have just posted a picture of the one I made this week on my blog:
https://theflashingscissors.blogspot.co.uk.finish-it-up-Friday-two-tiny-finishes/11.11.2016
Thanks again, Barbara x
Thank you for conquering my fear of zippers. This tutorial was really easy to follow. I just made one of these little pouches to hold plastic grocery bags. The plastic grocery bags have been banned in California but I have so many saved that I still want to reuse. This little pouch works great for holding about 3 or 4 of them when they are folded up. And I attached a D-ring with a clasp so I can hang it on the outside of my purse. I will definitely be making more to give to my friends.
Thank you again,
Patty
This is an amazing tutorial! I kept expecting to reach the ‘tricky part’ but you make it all seem so easy. If it comes together as well as yours I might treat myself to a 2A Bernina overlocking foot to celebrate! Thank you so much.
Thanks for this great tutorial. Perfect size for my change!
Thank you for this tutorial.. I have just made three of them (all different..! But that’s my mistakes, not your instructions..). They are very cute too. Thanks again.!
Adorei o tutorial . Vou fazer um pra mim hoje mesmo. Eu sempre time medo de colocar o ziper, mas depois desse passo a passo eu não tenho mais. Eu também gostaria de aprender Como Fazer Encadernação Artesanal.
Gee whiz! I’ve been searching for this pattern for 3 hours. I’m so glad I finally found it. I started a pouch last night but stupidly, didn’t bookmark the page. Thanks so much for the free tut. I love it!
Can you provide the directions in a PDF format so I can print them out? Thanks!
I made this today. I love it and will definitely be making more. Perfect for back to school. Thank you for the tutorial and the detail. I don’t usually like making bags with raw edges but your tip on zigzag settings was really helpful and I’m pleased with the finish.
[…] making quick makeup bags or coin pouches, I still say you can’t go wrong with how quickly the Easy Zippy Pouches go together. That said, these are pretty quick and easy to make too. I will simply give you both […]
[…] back to school list always included ear buds. I love this pouch by Dog Under My Desk to keep them from getting […]
This is superb!!!! Just exactly what I was looking for So well done.
Thank you!!
Planning to make this with a giant grommet hole to use as a poop bag dispenser while walking my dog!
Because we like to be cute while we are walking :)