
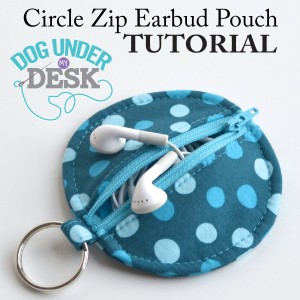
I use a little zippered pouch to carry around my earbuds since they are the fancy microphone ones and I don’t want them to break or get tangled. Some of you have commented that you are looking for some small, simple gift ideas. This is definitely simple to make, and a little more fun than the typical rectangular zippered pouch! I can see these as the perfect gift for teenage cousins or nieces or girlfriends or even teacher gifts. Fun, quick, and cute! It doesn’t take very much fabric so you could even use scraps! Sometimes I have the perfect fabric for something but I only have a fat quarter, or I want to make something extra with the leftovers from another project. This is perfect for that. You could even use 5″ charm squares! You can enlarge any of the photos by clicking on them, if you need to. This is a very basic zippered pouch, so hopefully some of you beginners will try making one!
UPDATE: I have completely re-written this tutorial with twice as many bright, clear photos and more detailed instructions and it is available as a pattern in my pattern shop. The free tutorial is still available below!
First, download the pattern template HERE.
Cut from main fabric:
1 circle
2 half circles
1 tab
Cut from lining fabric:
1 circle
2 half circles
Cut from batting (or medium weight interfacing, if you prefer): 1 circle
2 half circles
You will also need a 1″ wide nylon 5″ or longer zipper.

Place one lining half circle right side up and place the zipper right side up on top. Align top edges.

Place a main fabric half circle wrong side up (right side together with the zipper). Place batting on top.

Sew with a 1/4″ seam allowance. It’s important to use a 1/4″ SA here because the zipper is 1″ wide, and if we use two 1/4″ seam allowances we are subtracting 1/4″ from each half circle but adding 1/2″ in the middle of the zipper. Perfect!

Fold back and repeat with the other side. Then trim the batting as best you can without cutting into the fabric.

Fold everything back and press well.

Make sure the back side is away from the zip as well.

Topstitch 1/8″ away from the edge with a longer stitch length.

Now make the tab for the side. Fold the tab in fourths – Fold the edges to the center and then fold in half and topstitch.


Fold the tab in half and place it with the raw edges towards the outside of the circle, folded edge in, right over the zipper and sew it at the same spot where you tacked the zip.

Now you need to place the circle pieces wrong sides together with the batting in the middle. Place the lining circle wrong side up. (I’m using solids so it doesn’t matter, but if you are using a print, place it right side DOWN, wrong side up.) Place the cotton batting on top. Place the main fabric circle on top of that. Like a quilt sandwich. It’s so small you don’t really need to pin. If you used fusible interfacing in place of batting, just place the two fabrics wrong sides together.


You should now have these two pieces. Make sure the zipper pull is IN THE MIDDLE of the circle. You don’t want to end up cutting it off!

Flip the full circle piece over on top of the piece with the zipper, right sides together. (Now, if I was showing you how to do this the “right” way, I would tell you to baste with a 1/8″ seam allowance around the outsides first. But this is a small pouch, and it will be fine if you don’t baste. Plus, it’s just for fun. Not basting also makes it easier to trim the batting after sewing!)

Time to sew! Start anywhere on the circle and sew all the way around with a 3/8″ seam allowance.

Since we didn’t use interfacing AND we are sewing in a circle, you might get some puckering (fusible interfacing helps keep the fabric stiffer so it doesn’t pucker as much.) It’s OK. Just lift up the presser foot every few stitches, pivot, smooth out the pucker and keep sewing.


Now cut off the zipper ends. Just don’t use your good fabric scissors! I keep an extra pair of scissors around of opening packages, cutting paper and cutting off ends of zippers.

Now pull back the fabric and try to trim as much batting out as you can without slicing fabric. I use sharp, tiny scissors for this. It’s not imperative but I think it helps reduce bulk.

Trim the seam allowances a bit less than 1/4″. I used pinking shears but it will be fine if you don’t – just clip the curves. Turn the pouch right side out. Topstitch around the outside with a 1/4″ seam allowance to enclose the raw edges.


Add a split ring and your earbuds and you are done!

OHH thats so cute!! Thank you for the tutorial.. I been jotting down ideas for gifts this year and those would be nice for the music lovers!!
Thank you so much for sharing this detailed tutorial. It is very well written, and you are right, this would make a great gift for teenagers, even preteens.
Laurie
Love this! Thanks so much for the tutorial.
Ooh, thanks for this tutorial! These are super cute! :)
LOVE this!! I just might try it soon. Thanks for sharing!!
This is absolutely fabulous! Great Tutorial!
I just finished your Iphone case tutorial and Now I can’t wait to sew this one. And I get to finally try putting in a zipper….
Thanks for the great tutorials!!! They’re awesome….Love your site!!!
Wow! Thanks for all the nice comments. I’m glad you all like it. If you’re ready for hand-sewing, next up will be a rectangular one with no raw edges!
Found this on Pinterest! This is great as an earbud holder, but also think about cash, extra keys, lip balm or any other small things to keep track of! :D
I plan on making this for my Dad for a change holder!
This is a great tutorial! Thank you for posting it.
This is completely adorable! I will definitely be making some of these before the holiday arrives. There are so many little things that could be put in this little pocket. Oh! Grand Idea….It would be great to hold a little pack of hearing aid batteries and a battery tester on the ring (I teach students with hearing loss) ! Thanks for the tutorial. I just know it will whip up so quickly!
This is soooo cute and such a great idea. A perfect little gift for all the difficult people on my gift list this year. I’m looking forward to setting aside some time to make several. Thanks for the clear, detailed instructions, plus the template. I’m sure I could have figured it out, as I’m a decent, self-taught sewer, and it’s a fairly straightforward design, but now I don’t have to. ;)
Rarely do we find such clear and concise instructions (and great pictures) for such a great little item to make for gifts! I plan on making lots. But I think I will go for the shorter zippers (cheaper probably…and less waste). Now I know what to do with all the remnant fabric that can’t be used for other things.
THANK YOU so much for sharing this.
I’m so not crafty, so could u just make me one?!? Please!!!!
NOT CRAFTY … IT’S TIME TO START! This is about the best beginner project I’ve seen – easy and something everyone would enjoy getting. Plus it’s a great start on installing a zipper where you have a LOT of leeway for mistakes. You’ll have so much fun making this that you will soon get TONS of ideas. Invest $130 on a good starter sewing machine and give it a try.
I agree with Ashley. I’d buy one. Please…. :)
This is seriously one of the best, clearest and easiest to understand tutorials I have ever seen! And a cute one at that!
Yes, could you please make me one? I will pay you. This is much nicer than any of the ones I’ve seen on Etsy. Love it!
Un grand merci de France pour le tuto, où comment retrouver ses écouteurs facilement
OK You guys are cracking me up. Thank you for all the nice comments! Part of the reason I made this a tutorial and not a pattern is because the seams aren’t finished on the inside! It’s sort of like backwards french seams with the topstitch, but the whole point of not finishing it was so that they were fast and easy to make with no hand sewing. Is everyone OK with that? It’s still going to be nicer/cuter than anything at the store! :) I’ve gotten a bunch of emails asking me to make these and sell them, so I guess I will have to give in. I have a huge fabric stash but I’m not good at choosing for people. What colors would you want? I will also need to order some more zips!
What a great tutorial!! and such a neat idea :) Thank you.
I love this!! soo cute and i along with many others would love to buy one!
I would like to see pink and maybe a blue one as well!! Can’t wait to order… Great stocking stuffers :)
I love this idea, mine are always getting tangled up. Thanks!
I would definitely buy one as well. I think I’ll be getting a sewing machine pretty soon, but the furthest I’ve contemplated is just making pillow cases for throw pillows. This seems a little more extensive, but I would definitely pay for a completed one haha! I think a pretty black and cream damask would look nice also :)
[…] I’d just seen this tutorial from Erin Erickson for circle zip earbud pouches and thought that was a much better way for her to keep a bit of that fabric with her. It just […]
I would definitely like to buy these! Where can I get them?!
I love this! I would alter it to hook to a separate ipod holder too, I think… maybe velcro together. Ohhh the ideas you have given me!
love this little pouch and great tutorial! I’d love it if you’d drop by my crafty linky party and share this……need some great projects to feature next week, plus I think you’ll like the party, lots of great inspiration from around the world every week! hope to see you there.
Super cute! I shared on my FB Fan page!
https://www.facebook.com/treasuresfortots
Erin-
this is a great little pouch! Great tutorial. Thanks for posting it-they will make darling stocking stuffers! :)
LOVE this…cannot wait to try. My cat has been chewing on my set by the computer and this is the perfect solution. Thanks!
As far as the unfinished seams…if it was for a gift I would just add a quick binding to the seam before turning.
Love this! I will be pinning and making some soon!
This is one of the most well written tutorials I’ve ever seen with very clear pictures. Thank you so much. I pinned it and can’t wait to make one for myself. It’s funny, just yesterday I was thinking “gosh it would be nice to have something to put my ear buds in, in my purse”. So thanks for sharing!!
So cute, and I love the concept of a keychain.
I made this and the iphone case with matching fabric and they look really cute if you want to see a picture checkout my facebook page. Just look up my name “Maia Neuman” in google and the first thing that shows up should be ~OnE oF a KiNd~
Fab tute, Erin! Darling, easy, and useful. Kudos to you! I made mine slightly different, but that’s ok — different ‘drummers’, right?! Thank you so much. I plan on making several of these for my kidlets and grand-kidlets. I will be searching for a good zipper source! Thanks again. Hugs, Cyn; -)
ps: I plan on blogging about this, but will click/link back to you as the originator. ;-)
I’m finding so many that you all have made! They look so cool! I’m glad you are all having fun with it! Don’t forget, you can add them to the group or Facebook page so everyone can see them!
https://www.flickr.com/groups/dogundermydesk/
https://www.facebook.com/dogundermydesk
I’m cutting out a bunch right now that I will put up on Etsy for sale in the next few days!
I love this, and I just made one for me as a tester before I decide how many to make as gifts:) It was wonderful and easy to follow. It even fits my shuffle in there with the headphones. This will save it from kicking around in my purse unprotected! Thanks!
Love this and I will totally make it… for ME! :)
This is just darling! Now I’m going to dig around my sewing room and see if I have a zipper because I want to try this right now!!
So cool! I am going to be making some of these for Christmas presents – for sure!
So cool….
Thanks for showing us how to make it,
This is a fantastic tutorial–one of the best written tutorials I have ever read! (and that’s a lot! :) I will definitely be making some of these for gifts. Thank you!
Love this! Great tutorial, I just made 10 for stocking stuffers! Perfect for Christmas! Thank you for sharing!
Erin, this is a great tutorial! Your photos are clear, your instructions well-written, and your sewing is neat and precise. I look forward to seeing what else you have and I look forward to making some of these for gifts. I found you via u-create and you’re now pinned on my board!
This is fantastic and so cute!!! I bought some of those rings so now I know what I can do with them. Your tute is also awesome very clear and easy to follow. Thanks so much!!
THIS IS BRILLIANT!!!!
I can’t wait to make two of these for my two teenage daughters! they will love them
thank you so, so much for sharing
I’ve just made one for my daughter in orange and yellow. I love it! I made it just a little bit bigger, so that she can not just put her earbuds in, but her whole iPod-shuffle as well. Now it will be better protected when she puts it in her school bag, and won’t get squashed between her books and stuff.
I have a niece that is getting a iPod Touch for Christmas and this would be AWESOME (and the case) for her for Christmas!!! Holy Cow (and just yesterday I was down to only 1 more gift to make). Wonderful! Thanks.
I found you via craft gossip. I love this tutorial and I must admit I am one of those people who have earphones tangling in my purse. I go to pull out my phone or a pen and I have to tug and tug and more often than not everything comes spilling out.
Neat Idea.
Wonderful tutorial, thanks so much, just what I need for my son…. Arlene
Love your very detailed tutorial <3<3 Thank you so much for sharing!!
Awesome idea, thanks for sharing and inspiring me.
I will go and make one now for my friend’s birthday.
Greetings from Vienna, Austria
What a great tutorial. Thank you so much for taking the time to do this!
What a GREAT little idea for everyone to use! Thanks so much for sharing this one! I can see this being used for many more ideas than just ear buds too. (Change purse, lip glosses, cell ph. charger cords, etc) MUCH easier to find in your purse or clipped to your jacket!
I found you through “Craft Gossip”
This is exactly what I need for my earbuds. Thank you for the tutorial. Hopefully I will find the time to sew this cute little pouch in the next weeks.
These are great – an uncrafty friend asked me to make her a couple and she LOVES them! And now I’m getting more requests … are we allowed to sell these?
i was sent this link by an yahoo group and I want to commend you on your step by step detailed info with pictures. I need pictures-lol and your type of instruction. Thank you for this!
I really like it, I dont use earbuds,, but this has lots of possibles!
THANK YOU
HI
I just joined a gym and can really use this pouch to carry my ear phones.
THANK YOU!
These would be great for our member craft table at our next quilt guild show. I’ll try them in various sizes. Thanks for such an easy and wonderful project.
[…] from Dog Under My Desk made these Circle Zip Earbud Pouches. Um, fan-tab-u-lous! This is actually one of the first projects that I “StumbledUpon”. […]
This is a brilliant idea!
Thanks for the tutorial. I have pinned it for Christmas gift making.
What a fun and fabulous idea! TFS the tutorial!
thanks for the tutorial , I wanna go to make some Christmas gifts…..thanks again
I love it. What a great idea!
Eric, you have got to be a teacher in your other life! If not, you ought to be. Your directions are extremely well-written and given just the right amount of explanation for WHY to do what you are suggesting. Fantasmagorical to the max! I’m an instant fan.
Kay in NJ
Erin, this is so cute! Dots on circles. Eeek! Love. Found you on SMS and very glad, too! Pinning this now. Thank you.
This is just what I have been needing now to make it. Thank you for the tute.
Great idea. I made two this afternoon.
Your directions were very easy to follow.
You can see them here:
https://runningwithrocket.blogspot.com/2011/11/saturday-afternoon.html
This is a great idea, a very clear tutorial with helpful, marked pictures. I want to make one for myself first, and then I will make some for other people too, if I must!! I mean, if they wish!
Wow. I thought these were the cutest things ever, so even though I haven’t sewed in many years…. and I was a little overwhelmed by all the steps… once I got started I saw how well you explained each and every step and your perfect pictures! Thanks so much. Even though mine isn’t so circular it’s still cute and good thing I bought two zippers I can attempt again!
Can’t wait to make many many of these!
[…] Here is a cute little gift idea I found: Earbud Case. A nice gift on its own but it would be cute attached to a wrapped gift as an adornment and extra little something. This pattern is by Erin Erickson and you can find the tutorial at https://dogundermydesk.com/2011/11/circle-zip-earbud-pouch-tutorial/comment-page-1/ […]
I found this on tumblr! This is a great tutorial with clear and concise instructions. I’ve never made anything beyond curtains or pillow cases, but I think I could actually make this.
featured these today! i already made one for my daughter! so awesome!https://kimboscrafts.blogspot.com/2011/11/shoutouts.html
Just thought you might wanna know, your tutorial was featured here:
https://bluegreenorange.blogspot.com/2011/11/what-i-love.html
Dropping in from Sew Mama Sew’s Handmade Holiday.
My offspring and their offspring seem to have sprouted earbuds for everything – mobile phones, Nintendo consoles, sony walkmans etc etc so these will be great presents and I can probably colour code them if necessary!
Thanks so much for this :).
Cheers,
Robyn
Do you sell these? How super functional, but I don’t want to go thru the trouble to make it! :) Let me know if sell these and how much, if so. Thanks!
Shireen
[…] An earbud pouch project. Super-cute! […]
I LOVE this tutorial. I’m going to try it for my cellphone earbuds. Your method of installing a zipper has inspired me and I’ve used it in my fabric baggies (https://www.sewlavie.com/2011/11/upgrade-time-for-sad-looking-baggies.html) Thanks so much!
LOVE this tutorial!! Esther.
[…] I first see this tutorial by Erin Erickson on Sew, Mama, Sew!‘s blog post on November 19th, before clicking over to her […]
magnific!
Oh, my kids are each getting one of these for Christmas!!! Thanks So Much!
[…] tape wallet or two, and maybe I’ll even sew myself a cute skirt or three. I found this cute earbud pouch, and I’m def adding it to my list of things to make as soon as I get some work done. Time […]
This is a really smart idea and I love it! I’ve been looking for somewhere to keep my earphones so this could really help. It’s also a great Christmas gift! The thing I love most about this blog is that it shows you how to make the object step by step. Thanks for the idea!
I have posted links to one of your tutorials on my blog. Please let me know if you would like me to remove it and it will be done right away. Thank you for your tutorial!
Ginger
[…] not very long ago via Ucreate. It is for making a little ‘Circle zip ear bud pouch’ (link). I figured, I have some scraps left over from my purple and black dress, why not make me one of […]
[…] lunch, but on Monday I forgot my thimbles at home, so I made one out of paper and tape. Heh, heh. Circle Zip Pouch I realized last night that my library copy of Heather Ross’s Weekend Sewing was due, so I […]
This is very cute! I cant wait to try it. Its very well explained!!
Thank you so much for sharing! =)
If I were a Teenage Mutant Ninja Turtle, now I’d say “Kowbnagua, dude!”
This is the BEST tutorial I have used Very Good!! I love my little pouch!! Great for camera lens!!
Thank You so much! Susan
Just made 3! One for my earphones and one for my Kindle charger which I usually just dump near my computer so it gets all tangled, not anymore! Also My DD wanted a pink one:)
Thx:)
[…] I saw this little project on a blog I follow and thought it would be great to store my headphones in my […]
Here’s a pic and a link back:)
https://www.flickr.com/photos/29277487@N03/6402898399/in/pool-freesewingpatternsandtutorials/
[…] my next trick I’m going to be sewing up one of these handy things. I’m usually fumbling for my headphones in the car to use my phone, or they get all tangled […]
Great stocking stuffers! I have three grandkids that have these little radios and earphones. Going to make them today as soon as I get three zippers!
Thank you for a great idea!
This is totally cool! I am going to try it for Christmas gifts and definitely keep some for myself. You are so creative! About how long does it take to make?
I love this! Such a great idea! Do you mind if I re-blog this (give you credit of curse) It’s Genus!!
Love. Beautifull
[…] Slipcover Case with Pocket by My Patchwork Circle Zip Earbud Pouch by Dog Under My Desk Kindle Cover by Skip to My […]
very clear and easy to follow tutorial. also, excellent headphone storage idea!
Do you make these to sell them? If so can you please let me know how much you charge for one?
Did you post these on Etsy? I can not find them
I guess I should give an update! I made a bunch of pink ones I will post today. Black and white ones coming by Friday. Unfortunately, I’m NOT cut out for production sewing! I sorted them by color so I don’t need to change thread as often. I’ll get the pink ones up today – pics are already done. :) Sorry it’s taking so long!!
Love this idea. Thank you for the great tutorial.
Your tutorial is very well done – mine came out perfect the first time through. Fun to make and super cute. Thanks!
Where do we look to purchase one, after u have listed it?
I just listed some pink ones. Here’s the link to my Etsy shop: https://www.etsy.com/shop/ErinErickson?section_id=10795099
[…] Thursday night sewing session and a crummy night time photo but I’m finished my headphone pouch. I used the fun little fabric my bff got me for my birthday since I sewed most of it into pouches […]
Thanks for the awesome tutorial! I just made one in about 20 minutes! Definitely will be Doug a few of these for Christmas gifts!
I think I may try this! Cute for the gym.
Made one yesterday and tt is really pretty. Your directions are fantastic! Thank you so much!
Oh WOW! That is darling! I love the shape… what a great idea. This is my first time to your blog and I’m so glad I clicked over from Sew, Mama, Sew! I would love to link to this tute and share it with my readers if you didn’t mind.
[…] used this tutorial to make an earbud holder. It was for a secret Santa swap with my […]
[…] made this earbud holder for a Xmas […]
Here is a link to mine :D https://www.flickr.com/photos/53865436@N00/6471360163/in/photostream
[…] because I think it looks made for my top fabrics. Thank you Dog Under My Desk for the fantastic ear bud tutorial. I fussy cut this one – even the lining, but it still was so fast! I think I could make one for […]
[…] I saw it and remembered a pin I had – so I had to try it! I used the tutorial found on Dog Under My Desk (cute blog name huh!) It’s a great tutorial, very clearly written. I knew Mikey wanted […]
Super cute idea! Doesn’t look too hard, thanks for the instructions!!
Really well done tutorial! Makes me want to start my own snappy little pouch right away – great use for fabric scraps & extra zippers. Thanks & Happy Trails!
Great tutorial! I have been carrying mine around in my pocket the past 2 days and trying to figure out what to do with them so they won’t get damaged. This will help a lot!
Thanks again!
Wow, I love your little pouch…can;t wait to make one!
I made one for my youngest daughter. She loves it and now I’ve got a request to make another one for my oldest daughter. Don’t let the fact that it has a zipper intimidate you.Thanks to the easy-to-follow tutorial, the pouches are a cinch to make.
Gina is right it is easy and I’m zipperphobic! I’ve had requests to make them too!
Thanks sooo much for posting this! Your tutorial was sooo easy to follow. I can’t wait to make another. Adding mine to the flickr group.
Thanks for this post, it looks cute.
[…] Circle Zip Earbud Pouches: for Madi, Kendyll, Karyssa, Erin, Liam […]
Love this tutorial! I had to share it on my CraftBliss Facebook page and I linked back to you. Happy Holidays! ~Dee
What a great tute! I am going to make one for my “what the heck do we get him this year” brother in law! Hurray!
ah! This is brilliant! Love it! I just made one for my friend’s Christmas present – it literally only took me little over an hour to make.
Thankyou!
Jess
[…] I am always losing my earbuds. Not anymore. […]
[…] – Circle Zip Earbud Pouch by Erin Erickson of Dog Under My […]
[…] – Circle Zip Earbud Pouch by Erin Erickson of Dog Under My […]
think I just found a present that my nieces and nephews would like!!! Now can I get them done in time for Christmas!!!?
Love it! I am giving this one a try.
[…] TUTORIAL Share this:TwitterFacebookMe gusta:LikeSé el primero en decir que te gusta esta post. […]
SO EASY to do!! Thank you so much!!! I will be making myself one and my hubby (made this and the iPhone sleeve for my son! I was scared with sewing with a zipper, but you made it so easy!!! Thanks!
What a lovely tutorial. I plan on making a few ASAP. I saw in your blog that you are nearly my neighbor… I live near DeKalb! Small world. I found your blog through another blog I follow because she made your Circle Zip Pouches. Small world! Love your work! ~Ann ;o)
This is AWESOME!! i’m going to make one, blog it, and tell everyone to follow you!!!
Thanks for the great tutorial! I just made a bunch of these for my 16 year old daughter to give to her friends for Christmas. The first one was a bit of a mess, but after that they were perfect. They were super cheap to make, since all I had to buy were the zippers.
I read the instructions twice and never saw what size of circle to cut. Did I miss it somewhere? I made 5″ circles because you mention using 5″ charm packs. I think 5″ is too big. My first ear bud pouch is just a bit on the big size. The whole ipod nano can fit in, and that is not necessarily a bad thing. Everything else was clear and easy to follow.
Thanks for posting the tutorial. I really like this project.
Hi Lucy…
It isn’t my tutorial, but because I was making some of these cute pouches yesterday, I figured I’d reply in case you are still making some for gifts. The circles are cut at 4.5 inches. There is a link to click on right under the first photo of the pouch “First, download the pattern file HERE”. I printed that and was measuring it because I wanted to make both the “regular” size and bigger ones too. Thank you to Erin for such a lovely idea and allowing the rest of us a lovely gift idea just in time for the holidays.
~Ann
[…] Keep your earbuds from getting tangled with this zipped earbud pouch tutorial. […]
[…] of the Hello Kitty Sewing Machine and a $100 Pink Chalk Fabrics Gift Certificate. Erin’s Circle Zip Earbud Pouch took first place in the category of Gifts for Friends and was the top vote getter across all […]
I just found you and LOVE your website. Love that you have two Yorkies as well – I’m a Yorkie lover, with my 5 1/2 year old girl, Snickers. From one Yorkie lover to another, thanks for all your crafty ideas.
Just saw this on Pinterest. Great idea! Thank you for the easy tutorial.
I really don’t understand why you tack the zipper where and when you do b/c it seems like you end up cutting that off when you trim at the end. Am I wrong?
Brooke – I do this because it keeps the zipper closed when you sew the tab on the end. Yes, you do cut it off when you trim at the end. I suppose you could skip that and tack it when you sew on the tab, but it’s more likely to come apart if you do it like that. I hope that makes sense!
Thank you (from the future, lol). I love this tutorial, but was wondering why you didn’t just use the end of the zipper with the metal tack- so I’m glad that someone asked a question that brought out your answer! (I don’t think I have put in a zipper since my home-ec dress, but this seems like a fairly safe way to work back into it.) I hope I have enough scraps after making bandanas for all my girls from the Girl Scout fabric I found on clearance to make these pouches, too! Maybe large enough to hold the bandanas? Or maybe just earbuds or chapsticks. Your tutorial is still going strong, 10 years later- I found it on Pinterest. :-)
[…] ou s’abîment tout simplement. Comme souvent sur Pinterest, l’image a un lien vers les explications pour la réalisation de l’objet en question. C’est une nouvelle manière de surfer qui […]
Thanks so much, my sister had a crush on your pouch. I sew her one for christmas. I posted it on my blog. Thanks for the great tutorial!
This is cute, I’m thinking of many things this could used for….thank you for sharing.
Thanks a lot…. I’ve done 8 of them, as coin purse with keyrings, to teacher’s christmas gifts. After publish them on my blog will link to you :)
maomaocrafts.blogspot.com
Adorei seu trabalho. Vou fazer também. Excelente tutorial. Parabéns!
wow! Looks cute! I’m going to make this. Love it!
Thanks for sharing!
[…] used Erin Erickson’s tutorial to make these cute circle zip earbud pouches for all my nieces (and a step-grand-niece). These were […]
[…] ook een voor jou! Mail me of laat een ‘comment’achter.Ben je zelf handig dan is hier de tutorialDecember 28th,2011 | Category:Creatief Leave a Reply Cancel reply Name […]
[…] chouette idée trouvée ici, quelques chutes de tissu et de feutrine, un peu de boulot, et hop, le tour est […]
Woohoo! did it! not as pretty as yours but I can practice! linked up to you :)
Hi my daughter found this for me and how cute, is the pattern shown the actually size, that I can use as a pattern please advise, if you have anymore cute patterns please let me know
Thank You
Carol
I love it!! The tutorial it plain enough I’m pretty sure I can follow it!
If you have time, would you please go link this post up in my Handmade in 2012 linky page on my blog?
I’m going for an all hand made Christmas next year and I do hope to see lots of grand ideas linked up over the next year.
Thanks!
[…] up, I made a rosary pouch, from this tutorial, for my MIL’s Christmas present to go with a couple of religiousy books from her wish list. It […]
Thank you so, so much for this tutorial! I used it to make a pouch for my MIL for Christmas and your instructions were super easy to follow.
Here they are, the 8 circle pouches I made, the green ones with batting and the red ones with interfacing (I think they work better…)
Thanks for sharing :)
https://maomaocrafts.blogspot.com/2011/12/round-keychain-with-coin-purse.html
Defo gonna make some of these…thank you for a clear tutorial…..happy new year.
I’ve tried this 4 times and it never comes out as a perfect circle like yours. Any tips?
Clarissa – Depending on your zip or seam allowance I can see how this could happen. What you can do is when you place the circle pieces on top, trim the zipper side even with the circle side. If for some reason your zipper side is coming out smaller not bigger, then just cut those pieces larger and trim them right before you sew on the tab. I hope that helps!
[…] first project came from Dog Under My Desk and I added personalization to the back. Thanks for such a great tutorial (although I […]
Made my first one today! Thanks for sharing. With some practice, I will get better. Not a perfect circle, but I already see where I can improve my technique for next time!
I missed this for Christmas but that’s actually a blessing. I always find that these projects are more daunting under a time limit. I will now use scraps and make some for myself! I love the two fabrics you used, I’ve got some red and white polka dots that I might try. I have never sewn with zippers, I’m still a novice so I was wondering: when you buy a zipper does it come with the zipper tack? Is that a little piece that you use to stop the zipper? I’ve always wondered that. Thanks for the great idea!
Gretta – I don’t like to use the metal tacks that come with the zippers. It’s too easy to sew over them and break a needle. I cut them off and sew a tack – it will be hidden in the seam, anyway.
merci pour le tuto c’est vraiment bien expliqué
thank you very match and Happy New Year Pat
[…] Circle earbud holder – I literally made this in an hour, from the time I sat down to cut the fabric to the time I […]
what a fantastic idea! i need something like this so badly. every case that comes with headphones are so inconvenient and so my headphones end up breaking after 6 months b/c i don’t use the clunky case. i love this!
Cheers and thanks for a great little tutorial – I may even make some of these – I always have good intentions…
Wow!! This is such a cute idea…. The green one looks so pretty…gonna try this one!
[…] kulaklığınızı daha kolay bulmanızı sağlayacak minik çanta yapıyoruz. Yapım aşamaları burada […]
I saw this an hour ago and now I have one!!! Thank you so much it is very cute!! I put the tab on the wrong end but so what it is a great pattern and easy to follow directions! So clever you are!
Thank you! I love quick projects! :)
Great idea. Thanks for the tutorial.
Hello and thank you for the great tutorial.
Do we have to use a zipper foot to sew in the zip?
Sarah – It depends on which foot you are using. On my old machine I found I could actually get closer to the zipper with a regular, non-zipper foot (the Brother zipper foot is weird.) Anyway, since you are not actually sewing past the zipper pull, you’ll probably be OK. Maybe use a standard/zigzag foot with the needle all the way to the side. Just measure your seam allowance and make sure it’s close to 1/4 from the edge of the fabric/zipper tape. Hope that helps!
When I found your tutorial for this earbud pouch I was very excited. I always like to carry my earbuds with me and this a a perfect solution for me. Keep the wonderful patterns coming!
Great freebie! You’ve been featured on the Quality Sewing Tutorials blog.
We hand select only the best free tutorials and patterns for home sewers.
I love this idea, and having headphones anytime, anywhere that I want them!
I love this idea. Think I am going to try it out. But could you explain how you tack the zipper.
Never done something like that before.
To tack the zipper I set it under the zigzag/standard foot and set the machine to the widest zigzag with no length and sew back and forth over it 5 or 6 times. If yours won’t go that wide, you could just do it by hand. You just want to make it so the open end of the zipper stays together. If you are really careful you could combine it with the step where you attach the tab, and just use a straight stitch and backstitch a couple times, but it might separate a little. No big deal if it does, though :)
Thank your for this explanation. I think I will tack the zipper manual :) Just to be safe.
[…] lastly, a bag all for me! This is based on that cute little earbuds case… just bigger. Can you believe I got this stuff on super-duper clearance? So […]
[…] is an example of a fun swap I recently did using the Circle Zip Pouch Tutorial from Erin Erickson of Dog Under My Desk. I love this pattern and the resulting pouch was fun to […]
I love this project, super cute and practical.
I linked you in my blog today.
https://licenciaparacoser.blogspot.com
:)
Thanks for sharing.
Ana
If you use quilted material can you skip the batting? Thanks…love this project. Have 14 grandkids and know they all will like this as part of their Christmas present 2012.
If you use quilted material you should definitely skip the batting. I would even suggest skipping the batting if you only have thick batting available. Thin batting or another layer of fabric/flannel would be best, or in your case pre-quilted fabric. In fact, if you don’t mind the back side of the zipper showing, you might even test out skipping the lining fabric. Why not?
I made an ear bud pouch over the week-end! Your directions and illustrations were excellent. Thank you so much for sharing.
Found this on Pinterest. Wish I would have seen it before Hubby spent $15 to buy my daughter an ear bud case!
Mt first attempt at this was a total fail, but i didn’t let that mess me up. Round two was a success! Feel free to come over and check it out!
https://aloveleemix.blogspot.com/2012/01/re-do.html
thanks for the great tutorial!
This is really a great tutorial! Thanks so much. I made 3 this evening, much quicker and much more professional looking than I would of expected. Your details in the tutorial kept me on track!
Thanks everyone! Glad you are still making them!
I made serveal of these for Christmas gifts for the ladies in my family. They were a huge hit. Since I quilt, I also made it a little larger to hold my hand sewing supplies for quilting while on the go. Thanks for the tutorial.
This is so cute. I need something to carry my headphones in. They get all tangled up inside my purse. I am going to go find some scraps in my fabric stash and make one. Thanks for the instructions.
Olá, Erin! Fiz a bolsinha seguindo seu molde. Passe por lá pra ver.
https://flordocampoatelier.blogspot.com/2012/01/olha-redondinha.html
Aproveito pra agradecer sua generosidade em fazer o tutorial. Muito obrigada!
Beijos e um lindo dia pra você
Adorei essa bolsinha. Vou tentar fazer. Vamos ver se sai alguma coisa parecida , rs.
Bjos Luzia
Thanks for a great tutorial
I made one for myself to use at the gym….
https://blueadt.blogspot.com/2012/01/headphones-pouch.html
Thank you for an amazing tutorial! I have blogged about it here:
https://withallgoodintentions.blogspot.com/2012/01/little-round-pouch-purses.html
This is a wonderful pattern, a great way to use up left over bits and bobs. Thanks for sharing and creating this great tutorial..
[…] Opberghoesje voor oordopjes Mijn oordopjes raken altijd hopeloos in de knoop in mijn tas, zelfs als ik ze om mijn Ipod wikkel. Daarom ben ik meteen aan de slag gegaan toen ik een tutorial zag op de site van ‘Dog under my desk’. […]
OMG I LOVE THIS! Your tutorial was very easy to follow! i made a bunch of these to add to xmas presents last year. THanks for sharing this project!
I’ve been surfing online more than 3 hours today, yet I never found any interesting article like yours
Hi Erin,
Today I hope to be finishing my third Circle Zip Earbud Pouch. I made a couple of ‘Two-Hour Tulip Purses’ for friends. As an accessory I am adding a Circle Zip Earbud Pouch from the leftover batik fabrics. I love them! So thank you very much for this great tutorial.
On the pictures I saw that you have a Bernina too. For topstitching, Bernina has a great edgestitch foot: number 10. You can watch the video about the foot here:
https://www.berninausa.com/product_detail-n25-i140-sUS.html
I use it all the time and it works great! So I thought I’d let you know.
Thanks again,
Esther
the Netherlands
Thanks for this tutorial. Its such a cute idea, and I have made two so far, but will most likely make several more! On the second one, I did the lining a little differently, so that there are no raw edges inside at all, and it was really just as easy, adding only one extra step. I will post pictures to your Flickr after Valentine’s Day because one is a gift for my daughter and I don’t want her to see it!! Thanks so much… one of the very best freebies I have found online!! (Keep ‘m coming!! haha!!)
oh wow this is so fantastic! And a great use for scrap fabric! Can’t wait to make this project – thank you for posting :)
It’s awesome for scraps. I find myself measuring my scraps before I pitch them (I’m not the biggest scrap fan) because now I have a reason to save them. :) Thanks for visiting!
Great tutorial, will definitely be making this! :-) Thanks.
[…] you just need a way to carry your ear buds….check this out at Dog Under My Desk. Erin will show you how to make a cute pouch to carry your earbuds. Rate this: Like this:LikeBe […]
I have to try this!! It is so cute and perfect for those scraps left from sewing
Can I translate this tutorial to Hebrew so more people will understand and be able to sew it?
I will give all the credit to your blog of course
I would love to have your permission
Thank you so much
Tamar
Hi i made one of these from your great tutorial you can check it out here
https://jennie61.blogspot.com/ Thanks for sharing it.
[…] Other little projects that I wanted to make we’re these earphone cases (tutorial by dog under my desk) […]
I saw this on Jennie’s blog – so adorable – thanks for such a great tutorial, I’m going to have a go at one tomorrow :-)
I just made the eye bud case for myself. SO quick, LOVE IT!
Thanks you for a fab tutorial – this is my first attempt, but there will be more!
https://www.flickr.com/photos/runcibledays/6898013075/in/photostream
cAN SOMEONE MAKE ME 4 OFF THESE DUE TO HEALTH REASONS…..
Would you be interested in making 3 of these for me? I would pay great…
Brenda – I tried emailing you but it bounced back. Can you send me a message using the contact form? https://dogundermydesk.com/contact-me/ And please make sure you type your email address correctly. I’ll get right back to you. Thanks!
I would so buy a few of these since I don’t sew. Have you thought of selling them? If you do, email me please!!! Very cool idea!
Great idea! Thanks for sharing.
I made some pouches as a present for my friends.
[…] by making an ear bud pouch to hang off the side of my shoulder bag. Have you seen this tutorial at Dog Under My Desk? Erin won the Pink Chalk Studio tutorial competition with it last year. I was so pleased – I made […]
Hi Erin, can we possibly buy these from you?! These are SO adorable and PERFECT! I would want a few for my friends, too! Please let me know! Thanks!
Diana
[…] I am training to run a 5K I have been all about my iPod and earbuds. When I saw this tutorial here I knew I could whip out a little earbuds carrying case in no time, and with scraps. It is much […]
This is soo cool. I have been trying how to do this. Thanks Now I can use some of the zippers I have in my stash!!
So are you selling them?? I want one!
[…] Next is this super cute earbud holder. Tutorial by Dog Under My Desk […]
Hi! I tried to contact you about featuring this on SewCanShe.com, but I haven’t heard back. Please let me know if that would be okay.
Thanks!
Caroline
Thanks for this tuto, i made one for my little brother and I think he will adore it ! I post my work saturday, you will see it then … (I offer it friday …)
Thanks again !
[…] bought a car a few months ago, the strike is moving into week FIVE.) I found this tutorial for a Zip Earbud Pouch linked to pinterest, from Erin Erickson’s blog called Dog Under my […]
I finally made it!! :D thanks again for the tutorial!!
And congrats on all your success! Everyone wants to make this, or buy this, or feature this :)
Jenn
Really nice tutorial – super! Thanx!
[…] first one is a little earbud case. I am tired of being disorganized… so I’m going to make one of […]
Definitely want to make some f these! They should be great gifts for daughter’s BFFs!
So I’m new to sewing… just bought a machine and then upgraded to a Embroidery one b/c they had a sale on a Viking :). Anyways, my first project that I did was your Two-Zip Hipster pattern (um… don’t know why I did that one as my first as it was not easy for me as a beginner LOL). Luckily I had help (I just had to have that bag LOL!!). I finished it yesterday and it looks great! Then I went back and sewed the Circle Zip Earbud Pouch on my own today, and it’s also super cute! I just wanted to say thanks for the detailed patterns. It really makes a difference!
Brandi
I made this for christmas for my 9 year old daughter. your tutorial was very easy to follow. and it turned out so cute! and what a great little idea you had. thank you so much. (i just taught myself to sew over the last year)
This is to cute, I will be making one. Thanks for the great tutorial you did a great job, making it very easy to do. I can’t wait to get sewing.
this is so cute, i will surely make one.. thanks for the tutorial, please keep on sharing!!
How cute! I definitely want to make one or two of these!! Thanks for sharing!
Love this, will be making these as Easter Basket stuffers! Thanks!
I love this little thing, I made one to match a tiny sundress and put a ribbon on it to hold her binkie…. lol Yes I know I am a bit goofy … looks like a tiny purse this way.
What a cute idea!!! I will have to have someone make mine. Your instructions are so easy to understand and detailed. I am going to see if I can have someone monogram an initial on it and give as a tradition gift!
Sorry meant Graduation gift.
[…] (I hope she doesn’t mind), and I made an earbud pouch out of scraps from the fabric (using Erin Erikson’s awesome tutorial). She’s a professional violist, so she probably always has an ipod in her […]
I love this! I am making this for sure! Thanks for the tutorial!
This is great! And perfect for my best friend cause she had bought the new ipod haha I will do it for her birthday!!
I’m excited to try this, but my printer’s not working! Can you give me the measurements? Thanks!
Heather – it’s a 4.5″ circle. As long as you get close, it will be fine. :)
Love these! Thanks for the tutorial!
https://eskimomomma.blogspot.com/2012/03/whats-with-delay.html
what a super cute project, I just whipped one out for a friend in no time :)
thank you!
this is so perfect! I made one for a friend yesterday and was amazed at how easy and quick it was to put together. Thanks for posting a tutorial :)
So Cute! I just made one from some scrap fabric I liked .. went together quick and easy …thanks love this little project. I think I will make some for the grandkids with their Initials on them.
I’ve thought of adding initials or embroidery on the back too. If you make them, post some pics – we’d all love to see!
This was a very easy to follow tutorial. I made my first one last night and loved how easy it was and how cute it turned out that I made two more. I even enlarged the pattern and made a bigger bag. Someone had given me oodles of zippers so now I’m off and running. We are theme park enthusiasts so I’ll put my camera in one and hook it to my belt loop! What a great little bag. Thanks!
[…] started out wanting to make this cute little ear bud pouch by Erin Erickson. Isn’t it adorable ? Tiny and round. You can dangle it on your bag. The […]
this is such a great idea. I have two sets of earbuds one for ipod and one for phone and they are always getting tangled. Can’t wait to make this
Wonderful tutorial!
Such adorable little pouches, many thanks for sharing your skills :)
Thank you so much for this great tutorial – I’ve just made my first but I’m sure it won’t be my last!
Awesome tutorial! Thanks so much for sharing!
Perfect and awesome tutorial! Please, tell me which is your Bernina’s model? Do you recommend it?
Спасибо! Очень полезная вещь! Попробую сделать себе такой же чехол.
[…] is just a mini-tutorial. I have only focused on the parts that are different than the circle pouch, so I have not included every step. Please reference that post for more instructions. This is […]
Hi!
It’s a really cute pouch! I´ve made one an started on a second already. They’ll be up on my blog shortly with creds to you! Thanks for the inspiration.
Hi,
I like that pouch!!! I made my second one these days and gave it as a birthday present to a friend. I just linked your tutorial in my blog. Thank you for sharing your nice idea,
Gruß von der
Elli
Hi ein,
this is a wonderful explained tutorial!
I tried it tonight and linked your site as well!
Many greetings form Berlin
Birgit
This is so awesome! I am definitely going to try this out. Then maybe my daughter will quit loosing them.
[…] asking (a.k.a bugging) me to make him a cover for it. I decided to make him an earbud pouch from this tutorial, which I also used back in December. He is an avid reader too, so I decided to make him a bag […]
I just made one for my sister for her birthday. I could use some practice, but it looks pretty good. Thanks for the tutorial.
You, my dear, are a genius!! Great tutorial! I made my first one this evening and I just need to be a little more careful when tacking the zipper ! I’ll keep this one for me since I rec’d an IPOD for Christmas, and make another one for my daughter. Thank you so very much!! ~karen
[…] very own creation. The Dumpling Make-up Pouch is by Michelle Patterns. And the earphone pod is by Erin Erickson. You’ll find more detailed images of these items […]
I just made 3! They are so quick and easy and cute! Thanks!
Thank you for a great tutorial! I linked to it on my blog, as well as a picture of the one I made.
Thank you for this tutorial! I did this last night and it was a fun project! I want to make a few more now :)
https://houseofwoyaks.blogspot.com/2012/05/2-more-projects-done.html
I loved this idea!! And I´m sure my teenage daughter will love too!! I put a link to this tutorial in my blog, ok?
can i just buy one from you?
Thank you for this tutorial! I made it today and it worked great. It will be used as a coin purse.
I did and I loved it!!! Easy to do and very charming!!!! Thanks for the tutorial!!!!
You give excellent directions. I loved following them. I pinned this on Pinterest it’s so cool! Thanks for creating the tutorial.
This is a very nice one. I will make one today I think. Thanks for the DIY
Отлично!! прекрасная идея для подарков!! спасибо! хорошая идея и очень понятный урок! Удачи вам :)
Hi – do you just sell these? I don’t sew! :)
I don’t have any for sale right now. I will make some soon and put them on Etsy. :)
Thanks so much for this very clear, detailed tutorial! Just made one for my daughter’s 9th birthday:)
This is SO cute! What a great idea, thank you!
Wow, it’s amazing! I’ll go on holiday abroad and it’s what i really need! Thank you so much!
Hey Erin!
So cute and I finally did make one. Your instructions were perfect!
Thanks for a great tutorial. I just made 2 and blogged about it tonight.
I will add them to your Flicker group too.
Thanks so much for this awesome tutorial! Just finished my first one and love it!!!! Will post on your Flickr group.
I attempted to make this yesterday. I haven’t sewed in years. I used an old dress that had a lining too. Problem was that I pressed it back and then the lining was too small. Apparently it melted. My daughter is making one by hand. She loves the idea. I am going to try again hopefully today. It is quick and easy when you do it right. I have trouble getting the stitch straight and keeping the sewing machine slow. It’s new and I haven’t used before. I will try again.
hi there!
thank you so much for the Tutorial! it’s very comprehensible.
i’ve already made 2 of them, and they turned out great – really nice and useful..
Thank you so much for this! I made one tonight for my 16 yo. Maybe now she won’t go through the earbuds so quickly.
Thank you very much for the tutorial, apart from being very useful is very cute.
kisses
This is a great tutorial — very clear, with really good photographs. I can’t wait to get home so I can try it!
merci beaucoup pour ce tuto :) c’est superbe et bien utile !
[…] Pinaddicts challenge, Michelle at Lost in Translation crocheted a gorgeous earbud case based on this one by Erin at Dog Under My Desk. Since my earphones are constantly to be found in a tangled mess in […]
[…] Gjorde en påse för hörlurarna idag. Använde mig av dennamanual. Väldigt välförklarande. Gjorde ett broderi på min påse. Broderade med […]
I made some of these today, you can see them here: https://ohthatannelie.blogspot.com/
Thanks for a great tutorial!
This is a brilliant tutorial. I just made the pouch, adorable and easy to make. Have you thought of a way to get around the raw seams inside? Perhaps you could use bias binding?
Great Website
Hi, just uploaded a couple pictures of my earbud case and a link back to your tutorial. Thank you so much for the great project! I loved making it and have more in the works.
Molly
I love my earphones but they seem to break so easily that I did this thing where you do the Chinese staircase knot around the wires and they don’t tangle as easily nor rip…. hopefully it works.. anyway, I also wanted something to put my ipod in as well and I think I will make this adorable little pouch a bit bigger to fit it! Hoping it works… if it does then I am going to make another one for my friend who’s having a birthday soon.
I love crafting and this is amazing. Thank you for putting up your findings! <3
[…] – Everything EtsyShrink Plastic Rings – CraftStylishNeon Leather Bracelet – Martha StewartCircle Ear Bud Pouch – Dog Under My DeskMagnetic Paper Dolls – One Pearl ButtonPajama Pants – Sew4HomeLego […]
[…] Circle Earbug Pouch from Dog Under My Desk. I personally plan to use this for a lunch money holder. And safely attached to the keyring […]
[…] hours to completely figure out. I must note that this was not the fault of the tutorial found at https://dogundermydesk.com/2011/11/circle-zip-earbud-pouch-tutorial/ but simply my own failure to be able to work out just how I would make this happen in three […]
[…] Mit dem niedlichen Spinnenstoff habe ich jetzt mal eine runde und kleine Geldbörse genäht. Die Anleitung dazu gibt es in englisch, und zwar hier. […]
[…] nuevo trajo unos audífonos no sabia donde o como guardarlos para no perderlos y recordé este tutorialde para hacer una bolsita con cierre y puse manos a la obra este fin de semana y así fue como […]
wow….I love this, so cute…thanks much..you really inspire me…..
[…] tuto ici Share this:J'aime ceci:J'aimeSoyez le premier à aimer ceci. Posted in […]
[…] into fourths and trim interfacing away from seams. Again, three hours of sleep… Refer to the Circle Zip Earbud Pouch if you have any concerns about those sorts of things, since it’s a bit more in depth. What […]
Thanks for a super tutorial, Erica! I’m a novice but I found it easy to follow. although my zipper ended up a bit wonky I’m so proud of the little pouch I made! I used a skull and crossbones fabric I’m sure my 13year old will be delighted with. He’s always losing his earbuds.
Many thanks again
This is a GREAT tutorial for beginners like me! Loved it!
I love it! Perfect Christmas gift :)
Merci pour ce tuto, simple, rapide et efficace, j’adore!!!
[…] Circle Zip Earbud Pouch by dog under my desk […]
[…] Headphone case (Tutorial) – Grab some co-ordinating fabric and Erin will also show you how to make this cute […]
My sister pinned this on Pinterest for me to make. It came out really well. I’ll be making a few more for gifts. Thanks!
I’ve made 6 of these so far – very helpful tutorial! thanks!
https://www.flickr.com/photos/40503061@N04/8139381086/in/photostream/
Thanks so much for posting this! Mine turned out super cute & I will be making more for Christmas gifts!!
GREAT tutorial – simple enough for beginners, but with all the details to turn out a great looking project. I’ve been sewing for years, and I think folks at all levels will enjoy doing this. I
[hit the wrong key]
love having another use for those scraps I don’t want to throw away.
Thanks for sharing this tute…it looks easy enough for me to make! I am going to give it a try and if it turns out nice…my nieces are all getting one in their Christmas stockings.They all have cell phones and Ipods, they are going to LOVE it!
[…] Circle Zip Earbud Pouch by Dog Under my Desk […]
Thank you so much for the detailed tutorial..my daughter would like me to make her one so I will be making a few for Christmas, thanks again.
[…] week I wanted to make something small and fun. I used this tutorial to make this adorable zipper pouch for Ada’s binks. She made the bag to hold her earphones, […]
I absolutley love this – great idea and a fantastic tutorial. Will be making some for Christmas to give as gifts as everyone around me seems to have some kind of i device but no one carries they heads sets with them as they get dirty, tangled etc…so this comes just at the right time, thank you!
Such a great little gift! I featured it on my stocking stuffer round up! https://www.lovebugliving.com/2012/11/handmaking-holidays-stocking-stuffer.html
BEST INSTRUCTIONS EVER!!!!!!!!
You should of worked for MSL they couldn’t write instructions for the simplest of projects
Thanks so much for sharing such a lovely tutorial. This bas will be really useful.
Once again – thank you,
Izaura
I made these from your pattern and love this! Great Christmas presents for folks. I blogged a pattern review for you. Thanks a million!
https://peasinapod.typepad.com/peas-in-a-pod/2012/12/earbud-pouches-pattern-review.html
[…] Circle Ear Bud Pouch ~ This circle pouch is perfect for keeping track of ear buds. It can also help keep them from […]
this is the cutest little pouch ever!!
Thank you so much for sharing…..this is so cute I have just finished sewing my first one…..I think all my friends will be getting one too!
This is the CUTEST ever little pouch! Fabulous tutorial!!! Totally adorable. I envision Santa bringing thise to many ‘good kiddos’. Thanks for sharing this little project!!!!
[…] Sew an ear bud pouch to keep your headphones from becoming a constant, tangled mess. […]
Thank you so much for sharing your great tutorial. Very generous of you.
Just perfect for my teenage granddaughter – will try and make it tomorrow as a little extra!
Thank you so much.
Thank you for the great tutorial! Really clear,easy to follow instructions. I’ve made 2 already!
Thanks for sharing! I need to make one for my ear buds too! At the moment I am using a crocheted pouch I made, but I think the pattern you posted will work better.
hi
Love your tutorial and the cute pouch. I’ve use it to make many pouch for my friends this christmas. I’ve also shared it at my blog. Everyone commented that it is very cute and i’ve linked them to your blog! Thanks again for the tutorial!
Thank you for sharing! You have some lucky friends. :)
Can’t tell you who I found your site, but I love it. This little pouch is very easy and fast to make.I made one this morning in no time. I’ll be bookmarking your site. Thanks!!
Thank you so much for this tutorial, I made up a bunch for Christmas presents this year and you can see them here https://petiteandsewing.blogspot.com.au/2012/12/christmas-sewing.html
LOVE this tut! My earbuds are always a tangled mess at the bottom of my purse. I’m going to make one for myself this weekend. THANK YOU for sharing your pattern!!
[…] week I wanted to make something small and fun. I used this tutorial to make this adorable zipper pouch for Ada’s binks. She made the bag to hold her earphones, […]
What a great tutorial and a gorgeous little pouch. I just finished one for my nephew’s birthday (he’s 7) and put some money in it. Cute cute cute. I’ll be making many more of these in 2013!
fantastico tutorial
This is awesome…I am going to make one for myself to attach to my car keys for putting meter money into. I never have coins when I need them…I use eftpos all the time…so I can now raid His wallet for coins! Thank you so much!
Brilliant. One of my friends uses hers as a keychain, which I immediately copied because I can never find my keys in my purse and now I can! :)
[…] started with the little pouches for earphones. I saw this tutorial ages ago and thought it was sooo cute… took me a while to try it, but once I did, I really […]
[…] le mini, j’ai utilisé ce tuto très […]
I can’t believe you are all still finding this and commenting after all this time. This has to be my #1 most popular anything, ever. Thank you all!
[…] Circle Zip Earbud Pouch by dog under my desk […]
I made this last summer, and brought it with me on a trip to see my extended family. They thought the concept was really great, and they wanted me to make a bunch for them :)
I have two questions: Which outside fabric did you use in this tutorial? And also, where do you buy most of your fabrics? I love all of the fabrics that you use in your tutorials!
The blue dots fabric is likely out of print. It’s a P&B Textiles print and I snatched up the last yard or so from one of my local quilt shops a couple years ago. Most of my fabric is Moda and Michael Miller. It’s not intentional, it just works out that way. For the biggest selection check out Fat Quarter Shop: http://www.fatquartershop.com. For bundles (so no thinking required!) try Fabric Tree: https://www.etsy.com/shop/FabricTree
This is a great tutorial and very easy to make. Thanks for doing such a great job!
[…] under my desk’ blog. I also use one to carry my debit/credit card. She also has a great ear bud holder or coin purse. I will have to place on my future project list. I always find my ear buds crumbled in the […]
I love this! I was wondering where you get zippers? They are about $2 each at fabric stores. Is there someplace more economical?
What a nice idea. This is such a cute bag. Great idea! Thank you for sharing!
[…] this earbud case for the husband. Easy peasy, though I wish I had a different color zipper. The pouch is […]
Hi Erin,
I just came across your blog while I’m preparing my trip to USA in couple of weeks =) (The prices are 3 times higher here in Norway… so I need to know where to go LOL)
Your blog is fabulous and so are your tutorials!! Thanks a lot for sharing ♥
I’m scared of zippers, but I sure will give this one a try!
Have a nice and creative day!
~Anne~
Thank you for such a lovely tutorial. I have never stiched anything before so will give it a try.
Thank you so much for posting this. I have never sewed before with a machine and I will for sure try this once I learn!
I just came across your website tonight and found so MANY ideas and projects I want to make! Thank you so much for all the great ideas! And tutorials!
Genial !!! Gratulieren, Super Idee !!!!
Liebe Grüsse
Erlaine
[…] dogundermydesk.com via The Handmade on […]
Thank you so much for sharing this tutorial! ♥
I shared this article in one of my blog posts:
“Recycle Fabric Scraps: Easy Crafts” –> https://ow.ly/jSqu0
Of course, I put a link back to your site. ^^
Thanks again! And have a beautifully creative day ahead!
[…] that has been in the works, but couldn’t show before is the little earbud holder. I used Dog Under My Desk‘s pattern, and it went together pretty quickly. I gave it to a friend, for she and I have what we call […]
[…] Full tutorial: Dog Under My Desk […]
[…] Mix Jars from Good Life Eats 6. DIY Homemade Christmas Chai Recipe from Easy Peasy Organic 7. DIY Circle Zip Earbud Pouch Key Chain from Dog Under My Desk 8. DIY Hand Painted Serving Ware from Better Homes & […]
Bernina!!
Need I say more?
This is a great project, will be made in the very near future. Thanks!
Love this, great tutorial too. I am making a couple of this.
Thank you for sharing.
[…] This little guy by Susan is adorable, using a modified version of the Circle Zip Earbud Pouch. […]
Thank you for this tutorial. I made two of these today. they turned out really well. I’ve been looking for a good way to carry my ear buds with me.
Yay! :)
thank you for this really nice and cute idea and tutorial!
i made one of this and will give it as a present. …just think, i need one, too. :)
[…] Instruktionen kan du se her: https://dogundermydesk.com/2011/11/circle-zip-earbud-pouch-tutorial/ […]
[…] bowl to get a diameter of around 11cm – experiment please! Or look at the free tutorial by Dog Under My Desk who has proper photographs and everything. Her technique for lining is different though. I used a […]
i don’t have a sewing machine, and i had to hand-sew it. but, it turned out great!
yay!
Is it possible to make one without a zipper (i know that’s probably a bad question)?
That went together fast!
I can knock out a ton of these for my twin’s birthday party swag!
Thank you!
You are VERY talented!
This is wonderful! It’s seems so easy. I’ll try this weekend. Thanks!
Greetings from Montenegro :)
Tasha
[…] Und zwar da geklaut *klick* […]
Do you think it would be possible to make this with leather instead of fabric?
[…] Link to the tutorial: Circle Zip Earbud Pouch […]
Thanks for the great idea and tutorial. I have made 2 since yesterday. Keep up the great work! Your tutorial was fabulous, I followed it step for step, only got alittle confused when it came to sewing around the circle. I was not sure if I should be sewing the zipper while it is open. Please give me a tip on what to do here.
Best regards,
Stephennie
[…] Earphone Holder (idea I pinned from Here) […]
[…] notebook with cover (tutorial here), purse organizer (pattern here), thing I put my earbuds in (pattern here), sunglass case, pencil case (pattern here) and in the middle, of course, my cup […]
Hi,
Love this project! Finished in a few hours…..had to watch the Seahawks beat the Cardinals last night while sewing….anyway wanted to share a picture of my finished product. Thank you!
[…] found this easy and cute little tutorial at Dog Under My Desk. Earbuds are nice and portable, but they sure can get tangled! And those little soft things that […]
Lovely and very useful pouch ! Thanks for sharing ! Great tutorial !
I’m very late to this, but thank you for such a detailed tutorial and what looks like being a spectacularly useful piece of equipment for those of us with bud earphones, USBs or, as you say, any small object we’re in fear of losing in the depths of our handbags (coins for me; I never seem to have any where I need them when I’m trying to feed money into parking-ticket machines).
Hi! It’s never too late. I still make them… lots of them! Welcome!! :D
Just made this for a Christmas gift. Thank you so much for the easy to follow tut!!
Hi! This was so easy to make and a great idea! Thank you for offering the pattern. I used fusible fleece since I didn’t have any batting at home and opt’d not to do the top stitch around the outer circle, just love them. I made 1 for each of our 4 girls for stocking stuffers! Thanks!
Hello, I just made your cute little pouch. My daughter wanted something to store her engagement ring in when at the gym. It is ideal. Thanks heaps!
Hello, I’ve just made this cute little pouch for my daughter. She wanted something to store her engagement ring in while at the gym. This is perfect. Thanks heaps!
Hello, just made this cute pouch for my daughter to store her engagement ring while in the gym. Perfect! Thanks heaps!
Hi there! Just made this little pouch for week 5 of my Craft Callenge 2014! Thanks so much for the tutorial. https://kiwisandkrauts.blogspot.de/p/kreativ-challenge-2014-craft-challenge.html
I love the circle pouch and the heart pouch. Your tutorial was excellent, however somehow I ran into trouble. I tried making the Heart pouch. When it came time to put all the pieces together for the final stitch around, the two hearts did not match up. Was this because I did not use the correct seem allowance when attaching the pieces to the zipper? If It happens again on my next attempt, I guess I could probably just trim the larger one (which is the split one) down to match the back heart…. But somehow it doesn’t seem like that’s how it’s supposed to work. If you have any suggestions I’d appreciate hearing them. I think the circle pouch will be easier and I might try that instead. Thanks for generously sharing and for the great tutorial.
Please disregard my last post! I tried making the heart case again and this time it worked out perfectly. I was a little more careful with the seam allowance and that solved my problem. Can’t wait to whip up several more to use as gifts for friends at a valentine gathering . Thanks again!
Thanks so much for the tutorial. I was so scared to do a zipper pouch and I had no trouble at all with your excellent instructions. Made one with my granddaughter and now she is hooked on sewing.
Thanks so much for this giving us this darling tutorial! Made my first one in about an hour…while watching TV…and it came out great. What a wonderful way to use scraps of fabric!
This is just so awesome, awesome!!! You are quite special. Thank you very much.
Thanks for the idea!!!! my earpiece gets tangled up in my handbag ALL the time and it’s annoying!! Love this idea.
Wonderful, thank you for such a lovely and clear tutorial,
Thank you so much… it is a wonderful idea!
…and you make such a perfect and lovely and clear tutorial!
Thanks a lot from switzerland
Nicole
Thank you for this lovely little pouch. I will be making one, tonight, to go with my daughters birthday gifts. I also know who will get one for Christmas.
Thanks again, from Australia
Muchas gracias me ayudo mucho tu tutorial…yo he hecho uno parecido ya que me salte algo que otra paso… la semana que viene lo publicaré, te hago alusión…un saludo
I love it! It seems easy . Thanks for this great tutorial. I will make mine tomorrow
Hi
I don’t have a printer at home, could you tell me what size the circles need to be so I can find something at home that is roughly the right size to draw around.
Many thanks
Hi Sue, the circles are 4.5″ Close is fine. I know some people have found lids from nut or butter containers that work well. :)
Hi Erin
Thank you so much for getting back to me – off to find something in the kitchen that is 4.5″.
Many thanks for the amazing idea, Sue.
I have never sewn a zipper before ever. And I just made this! You made it so “do-able”. It’s certainly not perfect, but I’m awfully proud of myself. Thank you SO much for giving this beginner a shot of confidence!
Thank you so much!
I have just made some from Liberty pieces as thank you gifts for my OB and Midwives.
Le tuto est si bien fait, l’idée est tellement originale que j’ai fait un lien sur mon blog !
https://les7joursdhelene.canalblog.com/archives/2014/09/11/30551238.html
Merci
Algmiae
[…] Circle Zip Earbud Pouch Tutorial – Dog Under My Desk – OHH thats so cute!! Thank you for the tutorial.. I been jotting down ideas for gifts this year and those would be nice for the music lovers!!… […]
That is such a cute project!
totally making this for xmas gifts!!!
Thank you so much for this!! I finally got to sit down and make one, and it actually turned out pretty well! I haven’t had access to a sewing machine for years until very recently, and this was my first project that required a zipper, so I’m thrilled that it looks mostly like your photos!! :) Going to make a bunch more as Christmas gifts.
Thank you for this tutorial. I have a question about cutting the half circles. The pattern says to cut 2 from main fabric. Is there any reason I can’t cut two whole circles from my main fabric, and then cut one of those circles in half?
Thank you!
can you make one for me because i will failed at it
I am always looking for scrap projects, and JUST found this on Pinterest last night. I’ll be stitching up quite a few of these to use up some more of my scraps and excess supplies and give them for gifts. But I’ll make a few for myself first.
Thank you!!!
I love it when people act as though their patterns are actually protected enough, that they think they can tell others that it’s for “personal use only” and that they have no permission to sell products made from their patterns.
When in fact: Yes we can not copy and reproduce your pattern and sell it as that – a pattern,
But we actually CAN make the item, from your pattern, and sell that physical item we made from your pattern, you can’t tell someone what they can use your pattern for. It’s not legally protected in that way.
People make similar projects all the time, I could make this same little pouch, yet use a completely different method in doing so, you can’t prove I used your pattern and therefor wouldn’t be able to make me stop selling it.
I am doing this in my sewing class today. Ready to see how this turn out. i AM IN HIGH SCHOOL
I loved this project, and I want to make one. The instructions are nice and clear, but since I’m looking at this from my phone the pattern doesn’t show the measurements for the circles and half circles. I would please like to know this, so I can get started.
Hi Aracell! It’s a printed PDF template which is why there are no measurements, but it’s a 4.5″ circle if that helps you make it without printing. :)
Oh my god, thank you sooo much. Really appreciate it.
I wanted to let you know that I linked this project at my blog as part of a fabric stash busters feature. You can read the post here: https://nur-noch.blogspot.de/2015/02/15-fabric-stash-bustersstoffreste.html, Best wishes Ronja Lotte
Thanks for this tutorial, I’ve made several of these, they’re such fun and use so little fabric. I drew round an old CD for the size, it seemed just right.
So cute. I have seen it in pinterest and also inspired to make. I have just made one and pin it in my board.
Thanks for the idea.
I hope my nice would like it. I have make it for my nice.
Thanks for all of your ideas – I will be teaching teens sewing in the new (school) year – and I will certainly look to you for ideas
Hi, I am wondering how you would ‘tack’ the zipper. I have never sewn with zippers before and I want to make sure it doesn’t unravel or anything. And is it ok to sew over the zipper, it wont hurt the sewing machine I am assuming? I am a beginner. LOL. Hope its dumb questions. haha.
Hi! Have you made this little project yet? I just did and my zipper released from the circle immediately after I was finished with it. (I just commented on it below). Next time I’ll use the zipper as it’s manufactured — by using the manufacturer zipper end/stop OR I’ll tack it closer inside the circle so it actually works. To tack something, you simply go back and forth over it several times with your machine, or you can do it by hand with needle and thread.
Hi! You can sew over a nylon zipper, just do it carefully and slowly if you’ve not done it before. I usually make tiny adjustments to where my needle will slip through just to make sure it doesn’t hit one of the teeth, but you can totally sew over them and cut them with regular zippers. To tack you just use a wide zigzag stitch on a 0 stitch length and sew back and forth. It’s a temporary stitch, like a basting stitch, and will be removed later. It’s just to prevent the zipper pull from coming off while you’re sewing and to keep the zipper aligned while you sew on the tab. When you sew all the way around the pouch at the end, reinforce the part with the zipper by sewing back and forth across it before continuing. You can do it! :)
Thank you!!
Great tutorial and I just made one. One thing I will change in the future because it makes no sense…. is the zipper tacking and little tab. It makes no sense to tack it at the edge of the circle and then sew a 3/8 inch seam allowance all the way around and then cut away the excess. You are cutting away the zipper tacking and the tab tacking you just did. Mine is ok, but immediately after I turned it and sewed 1/8 inch all the way around, the zipper end released from the circle. I had to go back and sew over it anyway. Next time I’ll use the zipper stop that comes on the zipper instead of “tacking” my own – because that will disappear when you do your 3/8 inch seam allowance. Thanks for a great little gift idea!
Hi! The reason that you tack the zipper is so that the zipper pull doesn’t accidentally slide off while you are assembling it, and also so that the zipper teeth stay together while you stitch the tab on. If you don’t tack the zipper teeth first, they can separate when you go to stitch on the tab. Cutting it off later is only after it’s secured by a line of stitches for the 3/8″ SA. If yours is coming apart, I would reinforce those stitches by sewing back and forth several times over the zipper teeth when you sew all the way around the pouch. If you leave the metal tab on, you may have trouble getting the pouch open far enough to be useful, as well as potentially strike the metal bit with your needle.
Saw this on IG this morning posted by @coleandtaffy. I am sharing it on my FB page.
Thank you for the CUTE tutorial!!
robin :-)
https://www.facebook.com/yourfatquartershop
I combined a black zipper with red and white fabric to make it look like a pokeball for my pokemon obsessed kid. I used this basic construction and made a minecraft square one for my nephew. Slowly getting Christmas presents done. Planning out a Dr. Who one in my head for my 6 yo.
Wow this was explained very well. Cant wait to make it “today” My phone ear piece is always wrapped around my purse stuff
thank you so much!
Very Nice. Cool tutorial.
Hörsystem för hundträning
Never did a zipper before. Guess this project will be my first. How long does this project take to complete?
These are adorable! Maybe I could get 7 done before Christmas? Guess what? I have 2 DGSs & 5 DGDs, so guess what they all have?…
I just had a question about applying the zipper. I am new to sewing and have never done anything with zippers. Can you use the regular presser foot and universal needle to sew one the zipper. Especially with tacking the zipper is that okay for the regular needle?
I think I may have figured it out. You set your machine to your zig zag stitch to as wide as it can go and the length a 0 then sew a few stitches. Is this correct? Thanks for the wonderful pattern! I am going to use these as Christmas presents!
Hi! A universal needle will be fine, although universal needles are just universally bad. They are halfway between a sharp and a ballpoint, but are actually neither. It’s best to use the right needle for the application – in this case a sharp (sometimes called microtex) or a topstitch needle.
For actually installing the zipper (not tacking it, use a regular foot for that) a regular presser foot will only work if you get close enough to the zipper, at least 1/4″ Sometimes you can move your needle over as far as it will go and get close enough, especially if you use a longer zipper and don’t need to sew around the zipper pull. Your machine should have come with a zipper foot, though.
Yes you seem to have figured out tacking, congrats!
Just wanted to let you know that I have had this tutorial bookmarked for a while and thanks to a snow day, I finally got around to making one for my iTouch charging cable. Love it! Now to make a couple more but with different batting! Thank you so much for sharing!
I made this lovely pouch for my iphone earbuds and I love it. It took me 90mn (but I took pics for my blog) I will put a link on my blog to your tutorial. Thanks you very much for sharing !
I made this and am really pleased, it was my first ever zip ! ( I’m a sewing newbie) loved this project and tutorial.
I used felt that I had lying around instead of Batton and worked just as well
Thanks so much I will be making many more as gifts ?????
I have had SOOO much fun with this idea. I started with one that looked like Pokemon ball for my 10 yo. I did a minecraft square for my nephew. Then I took on a Tardis for my 6 yo (that one came out a tad big). I’m now working on making one that looks like a book for a librarian friend. I love being able to customize them for the people in my life. Like many others, this was my first zip project.
Thank you for such complete instructions! I haven’t sewn much outside of quick repairs, and haven’t installed a zipper since Jr. High (I’m 47) My Daughter loves hers and its a great way to not lose earbuds in her backback at school.
Thank you for this! It only took me a couple of hours (with many interruptions of “MOM where’s my…” “MOM can I…?) I selfishly made mine from fabric that I love and did not make any for anyone else. I love it!
This seems really cool and not difficult to make. I can’t wait to try to make this.
Thank you for the great tutorial. I will make for my self and the great grands.
This is a great tutorial and so detailed thanks so much for making it!
I’ve seen this question asked but have not seen an answer and was wondering if it is okay to sell these after I make them? I was thinking about selling them on my etsy store and linking to this page to give you credit if that works? Please let me know thanks!
Hi! Yes this is fine. If you’re going to be making them to see you may want the full pattern version with more detail. :)
hi! im very new to sewing and i really want to try making this pouch but dont have a sewing machine. is it possible to sew it by hand?
Aloha – I just love this ear bud holder. I teach a weekly beginning and beyond quilting class and am always looking for little projects to share with my 6-10 students. I would like to use your pattern in this class and am seeking your permission. I will gladly direct everyone to your web site and give you credit for the design. Oh, I love your web site name too! I sew with two dogs under my feet. I look forward to hearing from you – Aloha from the Big Island of Hawaii – Susan
P.S. What a great & useful gift for all of my grandkids; plus a nice place to stash a $20 bill or gift card. Love it!!!
You need to add 1 full circle to the batting under the supply list. You show it in the picture but it’s not on the cutting list.
Hi Erin,
Thank you for the tutorial. I actually made some of these and was thinking to sell them in Malaysia. I made a few tweaks here and there (mostly because I am incapable of doing what you did haha!) but generally, I learnt from your tutorial. Figured I should ask you before doing so. Do let me know!
Thank you for sharing!
Made one for my niece for Christmas! (Mine definitely didn’t turn out as nice)I’m pretty new to sewing, so I really appreciate all the pictures and step by step how too thank you for sharing!
Thank you very much! I’ve made a bunch of these as stocking stuffers for Christmas this year.
A little late, but I made one in about 45 minutes! needed something for my tweener granddaughter. Easy! Great directions! I bought your zipand go bag pattern. I can’t wait to get started have to get hardware first. I haven’t attempted a bag in many years. Turned to quilting and now need to work on other things.
Thanks again!
I made 10 of these in a day for a stocking stuffer exchange- they were super easy! It would have taken me 3 days to figure out how to make them with no raw edges and get that zipper sandwiched in there correctly. Thank you so much for offering this free, and with such fabulous pictures and instructions to boot! My Walmart had zippers for only a $1 each,, I found latches at Hobby Lobby (in the jewelry section), and you could make dozens from each yard of fabric, so they’re economical too! I think my zipper foot would have made a few steps easier, but I had to use my mother-in-law’s machine as mine quit working part way into the second pouch. The regular foot worked okay in the end. Thanks again,
Hi there. I am writing from just about 9.5K miles away, from Athens Greece. Which in itself fascinates me in terms of how internet has sort of annihilated certain distances!
I am an absolute beginner in sewing. I have just bought my machine, took a few classes, trying to get acquainted with the machine and threading and sewing and all. So I was looking for easy projects to practice, when I found this beautiful post of yours.
Before I embark, can I just check that you do the zipper tacking and then the sewing of the tab over the zipper BY MACHINE.
Of course it looks like it in the photos, da, but I kind of wonder if it is OK for the needle of the machine…
How come it does not break??
OK… that’s it… thanks for your time. :)
Set your zig zag as wide as possible and your stitch to 0 to tack the zipper closed. The needle will clear the zipper part. As long as you use a nylon zipper, the needle is fine as you stitch around the circle.
thank you :-)
Thank you so much for the tutorial!! It makes a great quick gift for someone and you can use any fabric!! I always bring my earbud holder on road trips and I used an adorable kitty cat fabric!! I’m so attached to it and it’s so easy to make! I often bring it to my free period to listen to music and my friends are always asking for them… maybe I’ll make my own business in my middle school. This is a great inspiration for young sewers for me. Have a wonderful day!!
Thanks for a great tutorial. I made one of these this weekend and can see lots more being made in the future. Blogged here: https://k-made-it.blogspot.com.au/2017/06/speedy-stitching.html
Wow this was amazing! I did it in about an hour and I’m considering if I should do the top stitch or not. I am a begginner and this was amazing for me and you should do others like it. :D
I made these out of christmas fabric and added a little button. I used them as ornaments/gift holders for my handmade jewelry!
Thank you so much for sharing this fabulous post. Very much appreciated.
Thank you so much for this lovely idea and excelent tuto!
how much does it cost to make this ?
Hi and thank you so much for this tutorial! I have made the pouch successfully except I can’t get the top stitching even and neat. Do you have any hints or tips please?
Thanks
Faith
I just finished making one of these on attempt two! It looks super cute and will come in handy. I ended up basting the edges before sewing the back on for the second time because the first time the batting keep showing. I looks so cute I’ll definitely be making more of these.
I made seven of these for birthday favors for my 11-yr-old’s birthday. Love!!!!
As always, beautiful and practical pattern.
As I’m a beginner, can you please advise the reason/s you used Batting instead of Fusible Fleece in this pattern? What benefits does the Batting have over the Fusible Fleece?
Thank you so much.
Love your puppy xx
Hi Louise! Fusible fleece can be a fair weather friend. I work a lot with cotton and fusible fleece against quilting cotton will wrinkle/dimple and it doesn’t always press out after turning. You also can’t trim it away, so you need to cut it smaller if you do use it. I love sew-in products so I will always recommend them, or at least a combination of the two. I use Pellon SF101 woven fusible and then most everything else I use is sew-in, whether it’s foam or batting or stabilizer. This is because I trim them from the seams to reduce bulk. You can’t do that easily with a fusible product. Fusibles do work fine on heavier fabrics like twill, canvas, and other home dec materials so don’t completely cross them off the list, but I would suggest trying out a sew-in product next time and see how you like it!
Dear Erin
Thank you so much for your quick response!! And very clear answer. One more question if I may, so for this pattern, I just use a thin sew in batting?
Just love the clarity and pictures of your tutorials!
I’ve been trying to learn from a few websites, the art of making well finished and secure pouches and thankfully, eventually found yours! :)
Beautiful . Very beautiful.
Thanks a lot .
Thanks so much for sharing this tutorial! My kids are always misplacing their earbuds.
Your instructions and illustrations are great! I can’t wait to make them! Thanks, again😊
What a magnificently clear tutorial and the end result looks far more professional than many others. Thank you very much – I feel almost confident……
Hello!
I love this cute tutorial.
I’m completely new at sewing, never even sewed a zipper before. I want to attempt this adorable pouch!
What kind of batting did you use? And why is the batting necessary?
Any tips on how to do a zipper for the first time?
Thank you so much for making this fun pattern free and clear to follow!
Hi Meghan! The batting helps to stabilize the pouch and gives it a smoother look when it has lumpy earbuds inside. If you just used fabric alone you would see every bump. I use Pellon 988, which is a sew-in (non-fusible, no glue) version of Pellon 987 Fusible Fleece. Even though it is called fleece, it’s polyester batting. You do not want to use actual fleece or heavy cotton batting.
Make sure that you have a good, narrow zipper foot. You can also purchase something called Wash Away Wonder Tape at the fabric store which you can use to position your zipper. Thanks!
Merci beaucoup pour ce tuto ! J’adore !
This was an awesome craft to keep me busy during the holidays! Thanks so much for your thought out and easy directions to follow! I loved the craft and thanks again!😁
Thanks for a great tutorial! I am a high school teacher and teach sewing. Several of my students have used this tutorial and I love it so much that I am going to use it as well.
Such a great tutorial, just printed up the pattern and will be making some for gifts! Thank you for such a great little project idea!
[…] Ear bud pouch: https://blog.dogundermydesk.com/2011/11/circle-zip-earbud-pouch-tutorial/ […]
Nice one! I’m planning to enlarge this design to fit my wife’s over-the-ear headphones. Perfect level of detail, text, and great job on the pictures!
I love this tutorial. Since I have nothing to do, this will be perfect!
I just want to say thank you for your detailed instructions, as well as all the clear pictures that you posted. You made it easy for a beginner like me to complete this lovely project. Thank you so much!!
Thanks for such great instructions! I have not made anything like this in years, and it came out great! What a great idea. I am going to keep coming back for your great instructions on other projects. Thank you!
I started reading all the replies, but too many years to read all.
Can anyone tell me the size of the circle and how much bigger (beyond the middle) to make the half circles for seam allowance?
this is a great tutorial and a nice product but how is this tutorial for a beginner , like a beginner even knows what a zipper foot is and how to use it . thats all you say is use a zipper foot. i wish you would have elaborated more on that . the rest of this project might be easy but you can’t expect a beginner to know this .
There is a more detailed version available right here: https://www.dogundermydesk.com/collections/pdf-sewing-patterns/products/circle-zip-earbud-pouch-sewing-pattern
I don’t think I explain a zipper foot though, or how to thread the machine, as each sewing machine is different. You should definitely refer to the manual that came with your sewing machine. A zipper foot allows you to sew next to the zipper. :)
ur site is really amazing! Love it ! waiting for ur next tutorial.
Thank you for the free pattern. I will be making this for my 2nd oldest grandson for Christmas.
[…] ein schönes Wochenende? Ich hatte Zeit zum Nähen und durch Zufall fand ich im Netz dieses süße Kopfhörertäschchen und musste es gleich nach […]
[…] Circle earbud holder tutorial from Dog Under My Desk […]
Thanks for such great instructions! I have not made anything like this in years, and it came out great! What a great idea. I am going to keep coming back for your great instructions on other projects. Thank you!
Thanks so much for the “for dummies” instructions. This was my first hand sewing project and it turned out super cute.
Bonjour!!!
Il est très sympa votre tuto mais il manque une info….quel taille le cercle??
Merci d’avance…
Bonne journée!
Patricia
Thank you so much for your tutorials, they’re so detailed and must take a lot of time and attention to detail. Your sewing is so neat too – I hope I’ll be able to do your brilliant patterns justice!
Kerry
[…] Earbuds holder […]
Lovely idea,this look so cute,you can make it with another material and stone it or make an embroidery on it,this is really creative
[…] wykorzystałam tutorial “Circle Zip Earbud Pouch” Erin Erickson autorki bloga “Dog Under my […]
[…] Circle Zip Earbud Pouch Tutorial – Dog Under My Desk […]
[…] Circle Zip Earbud Pouch Tutorial – Dog Under My Desk […]
I have been looking for ways to make money from my home. Also for good ideas for Christmas and birthday presents. My grandaughter is always loosing her earbuds, and I think this is a great idea. Thank you for putting it out there for the rest of us to see and make….GB and have a great day
[…] chien sous mon bureau […]
[…] used to be scared of zips…. that is until I found a tutorial to make these […]
This was very confusing.
This was very confusing.
Love this tutorial! I’ve made a lot of these for gifts. The people love them. Some older ladies are thrilled to use them to keep and extra package of hearing aid batteries their purse!
[…] DIY Earbud zip case […]
[…] the full earbud pouch tutorial by Dog Under My Desk or check out an alternate video tutorial by Tanner […]