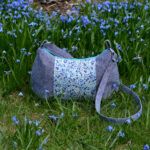
Layout Image
  • Blog
  • PDF Pattern Shop
  • Tutorials
  • Interfacing Tips
  • Pattern Tips
  • About Me
  • Contact Me
 Facebook Twitter Flickr Pinterest Twitter Instagram RSS

Subscribe to Blog

Get new blog posts from Dog Under My Desk in your email!
Click here to Subscribe to Blog via Email

Newsletter signup

Get the latest news from Dog Under My Desk.
Click here to subscribe to newsletter.

Erin’s Instagram


Join the Flickr Group

www.flickr.com
Dog Under My Desk Flickr! Group

Last Minute Travel Series – Add a Passport Pocket

By Erin Erickson · Comments (1)
Monday, March 25th, 2013

I designed the Essential Wristlet to hold a passport, phone, cash & cards. The Zip and Go is a slightly bigger, handsfree bag with the same thing in mind, so I figured you might want to add a passport pocket to the Zip and Go, too!

Add a passport pocket

Add a passport pocket

Maybe it’s just me, but when I travel I like to keep my passport on me. Leaving it in a hotel room isn’t the best idea and if you need ID while you are out for the day, a foreign driver’s license may get funny looks (so will a passport, but you get what I mean.) You could always tuck a Zip and Go into a larger tote bag if you’re carrying one, but then grab it when you just run down to the nearest Starbucks.

I can’t be the only one who does that… 

You need a main fabric and lining piece 5″ wide x 6″ tall + a 5″ x 6″ piece of fusible interfacing.
I also like to add a 1″ tall strip of interfacing to the top of the lining piece.

IMG_3412

Fuse interfacing to the wrong side of the fabrics.

IMG_3418

Place the main fabric and lining right sides together, then sew with a 3/8″ seam allowance,
leaving a gap on the bottom of the pocket for turning.

IMG_3423

Clip corners.

IMG_3425

Turn the pocket right sides out, gently poke out the corners, turn under the opening, press well, and topstitch across the top (the one without the opening) 1/4″ away from the edge.
I use a longer stitch length (3.5-4) when I topstitch.

IMG_3434Now place the pocket (topstitched end up) on top of the lining of your bag and edge stitch around the sides and bottom, reinforcing the top corners. (I did this right before Step 9 for the Zip and Go,
and placed it 1.5″ from the bottom of the lining fabric.)

IMG_3443

Add a passport to your pocket (once the bag is assembled, obviously :P)

IMG_3446

Perfect size!

IMG_3450

As we learned with the wristlet, iPhones and passports are similar sizes. :)

IMG_3458

iPhone 5 in passport pocket

Add a passport pocket to any bag!

IMG_3474

IMG_3631

Comments (1)
Categories : Bagmaking Tips, Sewing, Travel Series, Zip and Go

Introducing the Zip and Go!

By Erin Erickson · Comments (6)
Wednesday, March 20th, 2013

I’m super excited to introduce my new pattern, the Zip and Go!

Cover1

I never know what to say for these posts, so I’m just going to tell you the story behind this bag. I only took two purses on my last trip, a Daytripper and a Two Zip Hipster and both were perfect for just about everything we did. Trips to the city with lots of walking around? Hipster. Trip to the zoo where I “needed” 3 cameras? Daytripper. And of course we kept finding souvenir shops but nothing screamed my name. Several gift shops later and we came across a touristy little bag with front zippers. Of course, the one souvenir I buy would be a purse, right? And it turned out to be a good decision because we went to the beach the next day and I needed something much smaller than my two bags!

Road Trip!

The pros: It was just the right size to take everyone’s room key card, cash and my phone when we walked from our hotel to the beach. (Not that my phone worked there at all, but camera! I don’t think the Aussies believe in the universal right to free wifi like we do here. :P) The cons: It was so tiny that room key cards and an iPhone were *all* that would fit, the strap fell apart after using it once, and of course the raw edges and binding. You all know that I have nightmares about unnecessary raw edges and unfinished linings!

I swear sometimes she can read my mind, because my friend was like, “Calm down, you can totally make a bag like that, but in a way that doesn’t make you cringe.” Because I was totally cringing. So as soon as I got home I started with a much larger bag in mind, with a nice long adjustable fabric strap and a fully finished lining. I wasn’t really intending to make it into a pattern. It was so simple, and it was more to just prove to myself that I could do so much better. (Figuring out the best way to make the front pocket with the least amount of bulk was fun! I know, I have issues.) But then I posted this picture and dozens of you were like “I NEED THAT WHY DOESN’T THAT EXIST?”

IMG_1867-1

So, here we go. Appropriately named by another friend, the Zip and Go is ready for your hands free shopping trips, sporting events, theme park visits and vacation adventures. I think you’ll love them because they are FAST! Oh, and that fussy cut across the zippers? That’s built into the pattern design, so they will all turn out like that! Here’s the info from the product page:

This might be one of the most stress-free bags you’ll ever sew. It’s simple to make, it’s simple to cut out, it’s FAST and it doesn’t use up a ton of your precious fabric. The lining is completely hidden, so use a bright coordinating solid to save money! I wanted a super fast alternative to the Two Zip Hipster and Daytripper. While neither of them is particularly difficult, they are a bit too complex to be appropriate for that gift you needed yesterday. Making a dozen of these for your Etsy shop won’t break the bank or be a total time suck. I LOVE that. And so will you.

I’ve been using mine for grocery shopping, because it’s hands free and I don’t need to keep track of my purse in the cart. It’s a little bigger than the Essential Wristlet, and will hold your phone, keys and wallet. It’s also perfect for travelling and will keep your passport safe and on you at all times. My basic Kindle (no case) fits in the front pocket, and an iPad mini fits in the main pocket. Since it’s all rectangles, you could easily add inches to make the bag wider or longer as needed.

Instructions are included for strap widths from 1/4″ to 1″, so you don’t need to track down specific sized hardware. Add a fixed strap or a removable strap, which is nice for when you want to tuck the purse into a larger tote and not deal with the strap getting tangled. Make it adjustable for gifts or not, if it’s just for you!

There are no raw edges. You will turn it through an opening in the lining just like any other purse.

Perfect for teens and younger girls, too!

Approximately 9.5″ tall and 7.5″ wide with a 30″ to 55″ adjustable strap.

IMG_3293 (1) IMG_3602 IMG_3616
You can find it for sale in my PDF Pattern Shop. See the product page for a materials list and more information and photos!

Comments (6)
Categories : PDF Patterns, Zip and Go

Purse Hardware Supplies

By Erin Erickson · Comments (2)
Monday, March 18th, 2013

I’m about to launch the Zip and Go pattern, and I know hardware is always one of the most common questions that I get. So here is a run down of my current favorite options for hardware.

For the Zip and Go, you need one of these options:

IMG_3364 - Version 2   IMG_3616

hardwareMy favorite sizes for the Zip and Go are 5/8″ and 3/4″ (inside width) hardware. You could go as narrow as 1/4″ or as wide as 1″, and you could even skip the adjustable slider or use small O-rings instead of rectangle rings. Whatever combination you end up using, just make sure all the pieces will accomodate the same size strap.

These are my favorite 5/8″ lobster clasp sets from Tantalizing Stitches on Etsy. These are also my top pick for the Essential Wristlet.

Essential Wristlet - Perfect Corners!

Essential Wristlet – Perfect Corners!

I’ve found 5/8″ sliders here from Sewing Supplies on Etsy. And also here which includes the rectangle rings. Searching the supply category on Etsy for the width of the hardware that you want will get you some decent results.

Here is a 1″ set from Being Bags on Etsy, but keep in mind you need TWO rectangle rings per slider, not one. Usually you can contact the hardware vendors and they will set up a custom listing for you.

Australia friends, you have this lovely purse supply vendor as well, HandbagHardwareOz on Etsy.

I also know some of you have luck thrifting hardware from old bags. I always cut the hardware off of anything I throw away. Old, worn out duffel bags, old purses, anything like that. Save that hardware!

Daytripper and Two Zip Hipster

Daytripper and Two Zip Hipster

For the larger cross body bags like the Two Zip Hipster and the Daytripper, I prefer a 1.5″ strap width. These are my favorite 1.5″ rectangle rings and sliders set from Tantalizing Stitches.

And we can’t forget a shout out for the best zipper source on the internet, zipit zippers on Etsy! I’m pretty sure code: dogundermydesk still gets you a discount, too! :P I like the 1″ wide standard zippers for the Zip and Go and the Essential Wristlet, and the wider, long pull purse zips for the Daytripper and Two Zip Hipster!

Comments (2)
Categories : Daytripper, Pattern Tips, PDF Patterns, Two Zip Hipster, Wristlet, Zip and Go

Last Minute Travel Series – Mesh Lingerie Bags

By Erin Erickson · Comments (3)
Monday, March 18th, 2013

IMG_4151I took fancy clothes on my trip in October and I didn’t want to get snags in my tights, so I bought a lingerie bag to pack them in. I decided I needed bigger ones to hold my other stuff and made a bunch of large zippered bags out of fabric. I loved having my small things contained and not floating around my big suitcase. Then I came across THIS fabric:

IMG_9638It’s mesh fabric! So it’s see-through! I found it in the utility fabric section at JoAnn’s. I was curious how it would attach to a zipper, but it worked just fine!

I bought a yard since it was so cheap, which is more than enough to make 2-3 bags. Make these any size you want, the only limitation is the width of your zipper. 14″ zips are pretty standard, so I will use that size. This stuff seems to be stretchy in both directions so I don’t think it matters which way you cut it.

I started with a 12″ wide by 20″ tall piece of fabric. Then I cut two 1.5″ wide strips from quilt cotton about 12″ tall. You’ll cut off the extra length at the end.

Mesh1Fold about 3/8″ of one end on each piece to the wrong side.

Mesh2Fold in fourths, like straps, raw edges to the center. (If you use pre-made, get the 1/2″ wide stuff. Not sure how that will wash up, though. I pre-wash all of my fabric so I don’t usually have a problem.)

IMG_3789Place the zipper along the short (12″ side), face down on top of the mesh fabric. (That means the zipper teeth and zipper pull are right sides together with the mesh. Yes, I know there is no right side/wrong side for the mesh. The zipper teeth are TOUCHING the mesh.) Let both ends of the zipper hang over the ends of the fabric about an inch so you don’t need to worry about zipper pulls or metal bits yet. Align the edge of the zipper tape with the edge of the fabric.

Mesh3Use your zipper foot to sew with a 1/4″ seam allowance. Use a short stitch length (2-2.5) to make sure you catch mesh fabric. SEW WITH THE ZIPPER ON TOP. The zipper will be upside down, but it’s OK. If you sew with the mesh on top, the presser foot would stretch it out. With the mesh on the bottom, the feed dogs will pull it through more evenly.

Mesh4If you are having trouble with the mesh slipping or with the edges not staying aligned, let it stick out a tiny bit from under the zipper so you can keep an eye on it.

Mesh5Go back and make a second stitch line between the first 1/4″ stitch line and the edge. Since the mesh fabric is mostly holes, this helps make sure you’ve got it secured. (Enlarge this pic if you’re confused.)

Mesh6Fold back the zipper and topstitch. I turned my iron down a setting and pressed it lightly.

IMG_3959Fold the mesh fabric up so that it meets the edge of the zipper tape on the top/right side of the zipper.

IMG_3975Flip it over and sew like the first side – zipper upside down but on top, mesh fabric on the bottom, sew two stitch lines.

Mesh7UNZIP, fold back the zipper, press and topstitch the other half on the fabric side.

Mesh8Zip the bag and make sure it’s turned right side out. Fold the zipper down to about 1.5″ from the top. Press lightly and use either binder clips or quilt clips to hold it in place. (Pins won’t work ;)

Mesh22*Unzip part way* and tack the open end of the zipper (use a wide zigzag stitch).

Mesh9Then trim the zipper even with the sides of the mesh fabric. DO NOT CUT OFF THE ZIPPER PULL.

Mesh10Flip the bag over so the back side is face up. Start at the top with the folded short edge of the fabric strip. Unfold the long edge of the fabric strip so you can place it right sides together with the mesh fabric, aligning the raw edges. Cut off the excess fabric at the bottom of the strip, leaving 3/8″ to fold up and press.

Mesh12Stitch right in the fold, 3/8″ from the edge, backstitching at the top and bottom.

Mesh23Fold the fabric strip towards the outside of the bag and press lightly and carefully so that you don’t press out the creases.

Mesh14Flip over so the front of the bag is face up.

Mesh24Now fold the outside raw edge back to the center and press.

Mesh16Fold again so all the raw edges are tucked into the center and enclosed. Press.

Mesh17Edgestitch on the front side of the bag.

Mesh18An edgestitch foot helps! Try to catch the fabric on the underside to reinforce the stitch through the mesh.

Mesh19Doesn’t that look nice?

Mesh20Now repeat with the fabric strip on the other side!

Mesh21I filled mine with $1 Target fun socks! :D I LOVE using these in my suitcase to stay organized. One for socks, one for underwear, one for bras. I like how the fabric strips help keep them relatively flat.

When you aren’t travelling, use them for tights that you don’t want to get snagged in your dresser or maybe WIP’s you want to keep together, instead of using ziplocks.

Finished size is about 10″ x 12″. Make them as big or small as you’d like!

 DSC_2965  DSC_3004DSC_2998

Comments (3)
Categories : Travel Series

Last Minute Travel Series – Eye Mask Tutorial

By Erin Erickson · Comments (9)
Thursday, March 14th, 2013

This is really straightforward so I just made you a template and a little mini tutorial. (I’m not thrilled with the photos – tell me if you want me to re-take them!)

Cut 1 piece of fabric 9″ wide x 5″ tall
Cut 1 piece of batting slightly larger, 10″ wide by 6″ tall
Cut 1 piece of fleece or minky 10″ wide x 6″ tall
I used 16″ of 3/4″ wide knit elastic

Eye Mask Template

IMG_3698

Place the fabric on top of the batting. Quilt as desired. I used a basic grid since lines are my friend and I couldn’t free motion my way out of a paper bag. If you are really in a hurry, skip the quilting step!

IMG_3704

Now use the template provided to cut out the quilted fabric.

IMG_3710

Baste both ends of the elastic to the sides of the eyemask, matching the raw edges. Baste within the 3/8″ seam allowance. Fold it towards the middle to keep the extra out of the seams. This is a good time to try it on and make sure the elastic fits comfortably, since all elastic is different and everyone’s head is different.

IMG_3719

Minky can be fussy to work with, so it helps to use a wider seam allowance. For this project, I just cut a large rectangle rather than cut out the pattern piece.

Place the fabric right sides together with the minky. Sew all the way around with a 3/8″ seam allowance, leaving a gap at the top about 2.5″ long. Backstitch at the beginning and end of the gap.

IMG_3721

Trim away the minky away up to the seam allowance, leaving a little extra near the opening at the top. Clip and notch curves.

IMG_3733 (1)

Turn right sides out and press really well, avoiding the elastic. Turn the opening under and hand stitch closed. Topstitch 1/4″-3/8″ from the edge with a longer stitch length (I like 3.5-4 for topstitching.)

IMG_3757

Enjoy your eye mask!

IMG_3759

Make a scrappy version!

IMG_3770

Comments (9)
Categories : Travel Series

Last Minute Travel Series

By Erin Erickson · Comments (5)
Thursday, March 14th, 2013

I’ve been travelling a lot lately and I’ve discovered that even if I plan these trips months ahead of time, I’m STILL up until 3am the night before finishing last minute projects. Because who can sleep when you’re that excited? Besides, I do better with a 5am wakeup if I never go to bed, but that’s me. :D

So I have for you a bunch of super quick, easy travel related project tutorials. Most of these are meant to go with or inside of your rolling luggage, but you might find some of my bag patterns handy for your carry on “personal item” or for keeping your passport and wallet handy, and you can find those here:

Essential Wristlet (Perfect for a passport)
Two Zip Hipster (Holds your wallet, keys, water bottle, phone, boarding pass, a small snack…)
Daytripper (A great “personal item” for the plane. Big enough to hold your iPad and everything you will need quick access to, but it’s a purse shape so they won’t try to count it as your carry-on!)
Zip and Go (Also great for passport + phone or mini iPad or Kindle)

Coming Soon!
Drawstring Backpack (Great for when you get to your destination!)

As I get each tutorial blog post up, I will make the links active here. I might not get to all of these, or they might change. I’ll update the list as I post!

Eye Mask
Travel Blanket
Travel Pillowcase
Passport sized pocket (Add to any bag)
Fabric Belt
Mesh Lingerie Bags / Packing Bags
Luggage Handle Wraps
Resuable Bag (Maybe something for dirty laundry or an extra “I bought too much stuff” bag)
Drawstring Pouches (For shoes?)
Makeup Bag

If there is anything missing from this list that you must have, please tell me and I’ll see what I can do!

Comments (5)
Categories : Travel Series
« Previous Page
Next Page »

Sponsors

http://www.fatquartershop.com/
http://www.e-junkie.com/ecom/gb.php?cl=76235&c=ib&aff=229449 http://www.etsy.com/shop/fabrictree http://www.zipit.etsy.com http://tantalizingstitches.etsy.com
Become a sponsor!

Recent Posts

  • April Customer Flickr Finds
  • New feature – Blog subscriptions and a pattern sale!
  • Working on a formula for gadget sleeves
  • Last Minute Travel Series – Handle Wraps
  • Last Minute Travel Series – Easiest Travel Blanket
  • Last Minute Travel Series – Travel Pillowcase
  • Last Minute Travel Series – Add a Passport Pocket

Archives

Dog Under My Desk
Copyright © 2013 All Rights Reserved
iThemes Builder by iThemes
Powered by WordPress